How to Post Horizontal and Vertical Photos on Instagram
Instagram has evolved beyond square-only uploads, allowing you to post horizontal (landscape) and vertical (portrait) photos. However, if you’re not following the proper steps, your images can appear cropped, distorted, or low-quality, hurting your aesthetic and engagement rates.
In this guide, we’ll walk you through exactly how to upload landscape and portrait photos on Instagram without losing quality, using the right sizing strategies, editing tools, and optimization tips to ensure your feed always looks on point.
Want more people to actually see and engage with your posts? BuzzVoice can boost your visibility instantly, with real likes, views, and followers on Instagram, Twitter, TikTok, or other platforms and reach that help your best photos get the attention they deserve.
How to Post Horizontal and Vertical Photos on Instagram: A Guide to Size Guidelines
Before uploading any image to Instagram, it’s important to understand how the platform handles dimensions. Instagram automatically crops images that don’t fit its standard ratios, which can result in awkward framing or even missing parts of the photo.
Here are the standard Instagram aspect ratios and ideal sizes:
- Square (1:1) – Ideal size: 1080 x 1080 pixels. Still a classic and widely used.
- Vertical (Portrait) (4:5) – Ideal size: 1080 x 1350 pixels. Best for taking up more screen space and increasing engagement.
- Horizontal (Landscape) (1.91:1) – Ideal size: 1080 x 566 pixels. Perfect for wide scenic shots.
If your photo doesn’t match one of these ratios, Instagram will automatically crop it, which can cut off important parts of the image, so making the best choice of orientation is crucial.
Introduction to Instagram Posts
When it comes to posting on Instagram, users have the option to share a single photo or video or create a carousel post with up to 10 photos and videos. Understanding the different photo orientations, such as portrait and landscape, can help users create visually appealing posts.
Portrait orientations are ideal for capturing tall subjects like people or buildings, while landscape orientations are perfect for wide, scenic shots. By mastering these photo orientations, you can create stunning images that stand out on your Instagram feed.
Instagram allows you to post:
- Single photo or video posts
- Carousel posts with up to 10 photos/videos
- Reels and Stories (with their own ratio rules)
When posting to your main feed, understanding photo orientation helps you tell your visual story better. A tall building might look awkward in landscape mode, and a sweeping mountain range might lose its impact if forced into portrait. Using the right orientation ensures your photo makes the impact you intended to grow your followers and likes account.
Related Article: How To Make A Collage On Instagram Story
How to Post Horizontal Photos on Instagram Without Cropping
Want to share your stunning landscape photo but keep it intact? Here’s how:
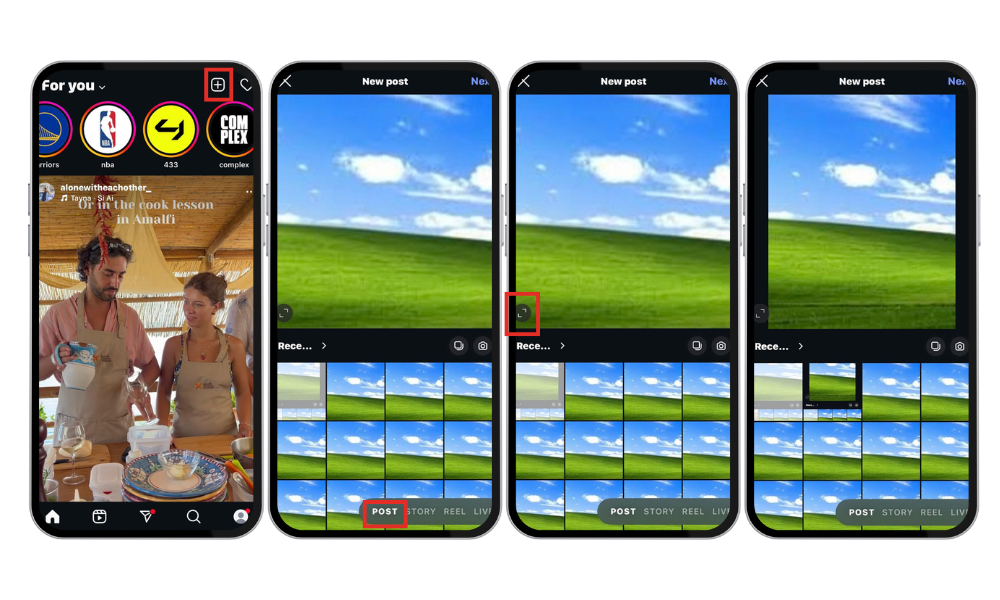
- Open Instagram and start a new post.
- Select your horizontal image from your gallery.
- Tap the expand arrows (bottom-left of the image preview). This changes it from a square to landscape format, then just posts. You can also drag the crop handles to adjust the framing of your image.
- If your image still doesn’t fit, use a photo editing app to add white or black borders so the full image displays without cropping. You can also edit the image to adjust its dimensions.
Here is how to do it step by step using the images below:
If your image still doesn’t fit correctly, use a photo editing app (like Canva or InShot) to add white, black, or blurred borders. This preserves your full image and ensures it looks neat in the feed.
👉 Need a visual walkthrough? Check out this video tutorial for help.
Image Orientation Basics
Image orientation refers to the direction in which a photo is captured and displayed:
- Portrait = Vertical format (tall)
- Landscape = Horizontal format (wide)
Most smartphones and cameras allow you to switch easily between orientations. Choosing the right one for your subject helps with composition and makes your image more engaging.
Examples:
- Portrait Orientation: Best for full-body shots, portraits, street fashion, architecture
- Landscape Orientation: Ideal for nature scenes, group photos, and wide spaces
Knowing when to use which is part of what separates casual content from curated, professional-looking feeds.
Best Editing Apps for Horizontal Photos:
- Canva: Add borders and adjust dimensions easily.
- InShot: Resize and frame your images specifically for Instagram.
- Snapseed: Make fine adjustments without compromising quality, ensuring every detail of your image is perfect.
How to Post Vertical Photos on Instagram for Maximum Impact
Vertical images perform exceptionally well on mobile because they fill more screen space, increasing the time users spend viewing your post. Vertical format is particularly effective for highlighting the height of subjects, making your photos more immersive and attention-grabbing.
To post vertical (portrait) photos:
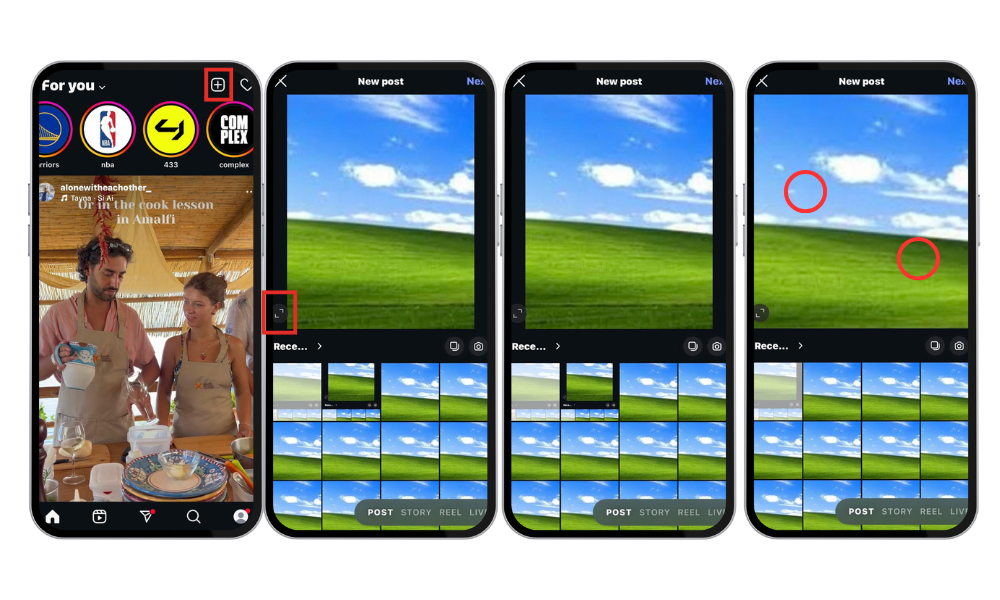
- Open Instagram, upload your image as usual and start a new post.
- Tap the expand arrows to allow the full portrait ratio (4:5) to display.
- Pinch out with two fingers to zoom out until the photo is visible without cropping, then post. Consider the intended use of your photo to ensure it fits well within the Instagram feed and engages your audience.
Here is an informative video on how to carry out the task:
Why Vertical Photos Perform Better:
- Fill more of the screen.
- More immersive and attention-grabbing.
- Ideal for fashion, lifestyle, and food photography.
Related Article: How to post a GIF on Instagram?
Understanding Portrait Orientation
Portrait orientation is a camera setting designed to capture a person or object with a sharp focus on the subject. Portrait mode allows users to create a photo with a blurred background, also known as a bokeh effect, which emphasizes the subject and makes it stand out more prominently in the photo.
Portrait orientation is often preferred for capturing human emotions and can create a more exciting photo. In portrait photography, the photographer works with the subject to capture their character, personality, and attitude. This orientation is perfect for creating intimate and expressive images that connect with viewers on a personal level.
The Best Apps to Resize and Optimize Instagram Photos
Whether you’re uploading landscape or portrait images, the right tools can ensure perfect dimensions and high quality. Ensuring your images are optimized before upload not only makes them look sharp and load quickly but also maintains a secure and verified connection with your audience.
Top Apps:
- Canva: Use the Instagram Post template to maintain perfect ratios.
- InShot: Resize and format multiple photos at once.
- Snapseed: Adjust image details, add blur or text, and enhance the foreground to draw attention to the main subject.
- Adobe Express: Professional-level resizing and design features.
Optimizing your images before upload ensures they look sharp, load quickly and stay within Instagram’s compression limits.
Common Mistakes to Avoid When Posting Photos on Instagram
Even seasoned users can fall into these traps:
- Uploading low-resolution images: Photos that are too small get stretched and appear pixelated.
- Over-cropping to fit: Instead, resize and add borders to preserve the image.
- Ignoring Instagram’s aspect ratios: This leads to awkward automatic cropping, which may disrupt the context of your photo.
- Not using vertical space: Vertical photos consistently get more likes and comments than horizontal ones. Not using vertical space can detract from the main subject of your photo, making it less engaging for viewers.
Landscape Photography Tips
Landscape photography is the art of capturing the spirit and emotion of the great outdoors through photography. To take stunning landscape photos, photographers should consider using a smaller aperture to increase the depth of field and add extra sharpness and richness to colors. Landscape mode selects a smaller aperture to increase the depth of field, which is ideal for capturing wide scenes, such as landscapes or cityscapes.
Additionally, photographers should pay attention to the composition, considering the rule of thirds and leading lines to create a balanced and harmonious image. By focusing on these elements, you can create breathtaking landscape photos that capture the beauty of the natural world.
Camera Settings for Better Photos
Camera settings play a crucial role in capturing high-quality photos. Most cameras have portrait or landscape modes that can be selected using the mode selection dial or menu. These program modes tell the camera to use pre-programmed settings, including aperture and shutter speed, tailored for the type of scene being shot.
Understanding the different camera modes, such as manual mode, and how to adjust camera settings can help photographers create better photos. For example, using a crop tool can help adjust the image composition, while adjusting the camera settings can help capture the intended mood and atmosphere of the scene. By mastering the camera settings, photographers can take their skills to the next level and create stunning images that capture the viewer’s attention.
Conclusion
Correctly sizing your horizontal and vertical photos for Instagram helps your content look polished, professional, and more engaging.
- Portrait and landscape photos both have their place when used intentionally.
- Editing tools like Canva, InShot, and Snapseed make the process smoother.
- Avoid cropping mistakes and blurry uploads.
- Use vertical orientation for mobile-first impact and higher engagement.
- Invest time in understanding your audience’s preferences and feed aesthetics.
Ready to grow your Instagram profile with content that gets noticed? Whether you’re posting polished portraits or creative landscapes, Buzzvoice helps you increase reach, likes, and engagement fast.
FAQ
Why do my Instagram photos look blurry after uploading?
This usually happens because the image resolution is too low or Instagram compressed the image. To avoid this, use high-resolution photos (at least 1080 pixels wide), follow Instagram’s recommended aspect ratios, and avoid heavy filters that degrade quality.
Can I upload both horizontal and vertical photos in a carousel post?
Yes, but Instagram will automatically crop all images to match the aspect ratio of the first photo in your carousel. To maintain consistency, resize all your photos to the same orientation and dimensions before uploading.
What’s the best way to resize photos without losing quality?
Use tools like Canva, InShot, Snapseed, or Adobe Express. These apps let you resize, crop, and add borders while maintaining high image quality and the correct Instagram dimensions.
Can I change the orientation of a photo after uploading it to Instagram?
No, once a post is published, you can’t change its orientation. Make sure to set the correct orientation (portrait or landscape) during the upload process by tapping the expand icon before posting.
Are vertical or horizontal photos better for engagement?
Vertical photos generally perform better because they take up more space on the screen, making users stop scrolling and focus on your content longer.
How can I add borders to a photo to avoid cropping?
Editing apps like Canva, InShot, and Instasize allow you to add white or black borders around your images. This keeps the original composition intact and fits your photo into Instagram’s posting format without cropping.
What file type should I use for the best photo quality on Instagram?
Stick to .JPG or .PNG formats. JPG is more commonly used and usually sufficient, but PNG offers better quality for images with text or sharp lines.
Should I use Instagram filters or edit photos separately before posting?
While Instagram filters are convenient, editing your photos using external apps (like Snapseed or Lightroom) usually gives you more control and better results. Once edited, upload the final version directly without applying Instagram filters.
Why does Instagram crop my photo even when I resize it?
It may be because the image doesn’t match Instagram’s supported aspect ratios (1:1, 4:5, or 1.91:1). If your photo’s dimensions don’t fall within those ranges, it may still get cropped. Try adjusting the aspect ratio manually or adding borders to fit.

BuzzVoice
BuzzVoice is the best place to go when you need instant engagement services on social media. Offering a wide variety of packages for Instagram, Youtube, Facebook, Twitter, Soundcloud & Tiktok.