Launched all the way back in 2010, Instagram is one of the five largest social media platforms in the world. Owned by Facebook, it has over 1 billion active monthly users and in a mere decade has become a vital piece of to a lot of our daily lives. The app is focused on people and allows them to share photos as well as videos. With so many personal pleasures and business opportunities on there, you really should know all about Instagram and how to use it. We’re here to help with this tutorial for beginners!
Table of Contents
A bit of background history
Back in 2010, two friends and fellow entrepreneurs from California – Kevin Systrom and Mike Krieger launched Instagram.

In just a few months, it became one of the hottest social media platforms in the entire world. Thanks to innovative ways and as a simplified, convenient outlet photo sharing, Instagram attracted the attention of investors, and after a mere 18 months of operation, Facebook bought them for 1 billion $.
Nowadays, Instagram is a member of the Facebook family but retains reasonably significant autonomy to make changes and improvements on its platform.

Why use it?
Instagram is the preferred social media platform for a lot of people. According to recent studies, it is used as much as (if not more than) Facebook. The sheer popularity shouldn’t turn many heads. It’s pretty apparent why Instagram has over 1 billion monthly active users now. Everything revolves around visual content. Pictures and videos dominate the landscape, which makes feeds very interactive and fun.

The advantages over other social media platforms are clear too. Sharing pics and videos has more meaning than just putting out small tweets which is its main advantage over Twitter. Instagram has better personalisation, also.
If someone thinks that Instagram is only about fun and has no business value whatsoever, they’d be mistaken. Even if LinkedIn is the primary social media for business networking, Instagram is home to about 25 million business profiles. Small and medium-sized businesses say that Instagram is their favourite social media network to advertise on because it brings the best results.

After they create an account, every user gets a personalised feed which will consist of:
- Instagram stories – temporarily available posts which disappear after 24 hours
- Feed posts – photo and video feed that contains posts shared by accounts that you follow
- Explore – the whole entirety of Instagram. Using ‘Explore’ allows the search for other users, the watching of recommended content, chatting with others via Direct Messaging, looking at photos from particular locations and finding everything that Instagram has to offer.
- Activity – for notifications about your interactions with others and how others interact with you.
Instagram is built around visual content and thus is a lot more engaging than Facebook, Twitter and almost any other social media app. You can look at content from people that you follow or browse for something new with ease. There are also Instagram Reels – a new feature to help you find short, entertaining videos (just like TikTok) and IGTV – for longer, more in-depth videos which don’t qualify as feed posts. Overall, Instagram is the complete social media package. When asked ‘If they could only keep one social media account?’, most people would definitely pick Instagram over anything else.
How to begin using Instagram?
Instagram is accessible via a mobile app or via the browser. Instagram app is available for iOS – in the App Store, for Android in the Google Play Store and on Windows Phone devices as well.

Instagram on the iOS App Store 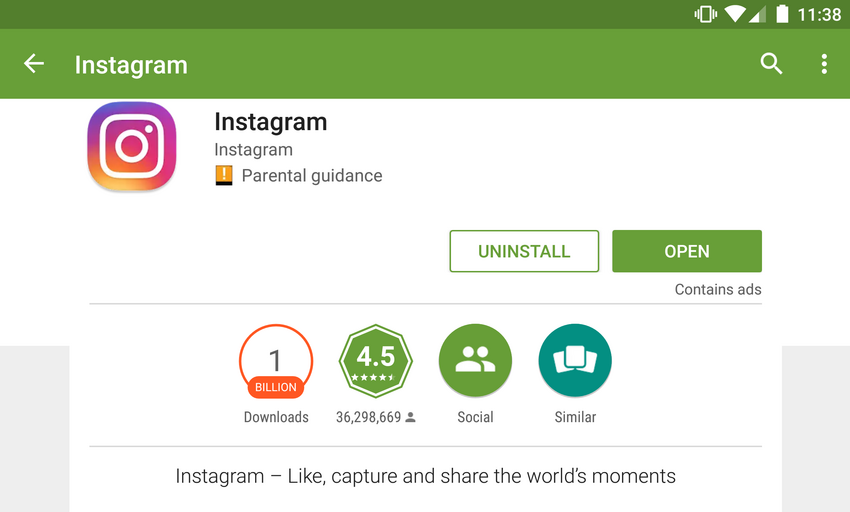
Instagram on the Google Play Store
The app is super convenient, and almost all users access Instagram via the app. You can also use a browser, but when compared to the app, it does have some significant downsides.
Generally, you have limited access to Instagram without an account. However, that access is minimal and very restricted. You can only watch a particular post or a small portion of a profile without an account on a browser. It’s much smarter to just spend 2 minutes of your time and create an account.
There are two ways to sign up on Instagram.
Method #1 – Sign up via the app
- Download the app via the links we highlighted above or find the Instagram app in your respective application store.
- Open the app by clicking on this
 icon
icon - In the next screen, tap the option, depending on your OS. You can also create an account by using ‘Log in with Facebook’ feature. This will skip step 4 and automatically fill out some basic info.
- ‘Sign Up With Email or Phone Number’ (for Android)
- ‘Create New Account’ (for iOS)
- Choose whether to register with an email address or phone number. Further steps are influenced by this choice.
- If you choose to sign up by email, that’s it.
- If you choose to sign up with a phone number, you will need to enter in the confirmation code, sent to your number.
- After selecting the sign-up method, create a username for your account (has to be unique), a password (not necessary when signing up with Facebook) and type in your basic profile info.
And that is it, you have successfully created an Instagram account from the app!
Method #2 – Sign up from a computer
- Visit Instagram.com and click the ‘Sign up’ button.
- Alternatively, you can also use the ‘Log in With Facebook’ feature to simplify the creation by using an existing Facebook account. This skips most of step 2. Once again, using Facebook is just quicker than signing up using an email, but it’s not mandatory.
- Enter your email address (or Mobile Phone Number), type in your full name, select an authentic username, create a password. Press ‘Next’
 to finish the account creation

1. Press Sign up 
2. Fill out your info
And that is it. These few simple steps will allow you to create a fully functional Instagram account. Now it’s time to move on to the good part and see what you can actually do on Instagram to make the most of it.
Worth knowing: Currently, around 98% of Instagram traffic comes from the mobile app, and only 2% is generated via the browser.
Familiarise yourself with the app layout
Before going any further, please make sure you know and understand the layout of the Instagram app. So, open it and let’s cover navigation together!
You navigate Instagram by using the menu bar at the bottom of the screen. The menu has five unique options, and each one of them opens an entirely unique window. They are five different feeds, really.
Home 
The left-most is your home button –
![]() .
.
When you open the app after it has been shut down, the ‘Home’ screen will always appear first, by default (unless you clicked on a notification).
Click on the ‘Home’ icon, and you will instantly see feed posts made by those accounts which you follow. This is how your home screen looks like

Browse/Explore 
Browse or explore – ![]()
is used to explore content on Instagram that was posted by accounts that you don’t necessarily follow.
At the top of ‘Explore’, you will see a search bar and the suggestions menu. Search is used to find other people on Instagram or to look for posts with particular hashtags as well as browse photos and videos taken at various locations.
The suggestions blocks below the search bar are shortcuts. They are different to everyone. The suggestions you get are directly impacted by your activity on the app. Instagram offers you to look at content that the app’s algorithm thinks you could enjoy and engage with. Think of it as ‘Recommendations’ for Instagram.

Finally – this little icon on the right side (![]() ). Not too many people use it, but it’s a shortcut for the QR-code camera. Every Instagram account has a unique QR code that you can scan with this particular camera. It’s not a widely popular feature, but it does come in handy if you wish to follow someone and their username is too hard to figure out. Just use this feature and scan their QR code. It will instantly follow the account to which the QR code belongs to.
). Not too many people use it, but it’s a shortcut for the QR-code camera. Every Instagram account has a unique QR code that you can scan with this particular camera. It’s not a widely popular feature, but it does come in handy if you wish to follow someone and their username is too hard to figure out. Just use this feature and scan their QR code. It will instantly follow the account to which the QR code belongs to.

The rest of this screen is an interactive gallery of photos and videos that are shown to you based on your activity. It’s the place where a lot of users spend most of their time on the app…
Camera 
Clicking this icon ![]() will open the Instagram camera/upload interface. From there, you can select a photo or video that you wish to upload from your gallery. You can also capture an entirely new image or video.
will open the Instagram camera/upload interface. From there, you can select a photo or video that you wish to upload from your gallery. You can also capture an entirely new image or video.
Activity 
Activity feed ![]() displays certain notifications that might be interesting to you. Most of the time, this window will be filled with notifications about who liked your photo, who commented and tagged you, etc. However, if you take a look at the screenshot below, you can see a lot of different activity notifications that include suggestions for following, suggestions for interacting, etc.
displays certain notifications that might be interesting to you. Most of the time, this window will be filled with notifications about who liked your photo, who commented and tagged you, etc. However, if you take a look at the screenshot below, you can see a lot of different activity notifications that include suggestions for following, suggestions for interacting, etc.

Profile
The right-most option is a shortcut to your profile screen![]() . Here you can access a whole lot of settings, edit your profile, look at your posts and interact with them, eye your followers and accounts that you follow, etc.
. Here you can access a whole lot of settings, edit your profile, look at your posts and interact with them, eye your followers and accounts that you follow, etc.
If you own a Business profile on Instagram, you will have access to a variety of exclusive features. The latter include profile insights, Instagram shop (if the Facebook shop is set up) and reviewing promotions (advertising).

All right. We’re all set. Now, we can move on to using Instagram and our tips for you!
Basic Tip #1 – Take Care of Account Privacy
Instagram is all about sharing your photos/videos and watching photos/videos of other people.
First up, you should decide whether you want everyone to be able to see your content on-demand or if you wish to be private. The difference between public and private accounts is that private accounts can approve people to be followers. This is a way to control who can see what you post. Public accounts just have to deal with whoever decides to follow them. Furthermore, if your Instagram is public, your photos will get indexed by external sites and will appear on Google search. If that is something that you don’t want to happen, make a private account.
Both types of accounts appear in the search bar, and their actions are visible (e.g. whether they liked a post or their comments). But private accounts do have more privacy. So, it’s really up to you to decide.
If you wish to have a public account – you can skip to Tip #2, but if you want to be private – here’s how you do it.
How to make your Instagram account private?
Making your account private isn’t at all difficult. Don’t forget that your profile will be set to ‘Public’ by default after signing up. So, you need to make it private manually. This is how to make your Instagram account private on the Instagram app:
- Open your profile (bottom menu, right-most option)
- In your profile menu, tap the three-striped icon
 in the top right
 - Select ‘Privacy’
- Click ‘Account Privacy’
- Toggle the ‘Private Account’ bar, and you will make your Instagram account private.

And here is how you do that on PC/Mac or on a browser
- Press on your profile icon in the top-right
- From the dropdown menu, click on ‘Settings’

- ‘Privacy and Security’
- Just a little lower than ‘Account Privacy’, check the box next to ‘Private Account’.
Basic Tip #2 – Set up the rest of your profile
We would like to note that these Basic tips are interchangeable and can be done in any order. We’ve just picked the first one to be one that a lot of people seem to forget 😊.
After you have set your account to be private or public, it’s time to finish the setup procedure. There are still some areas with a void that needs to be filled in. Your friends or your customers and fans (if you’re a public figure and/or business) need to be able to recognise you. This is why you need to:
- Add a decent profile picture
- Fill out your bio
- Add in your contacts (only applicable to business accounts)
- Make your first post!
Profile picture
Guidelines for a great profile picture
Your profile picture is your primary form of representation. The profile pic will be the first visual thing that pops up to other users when they search for you or when they see you in a list with other users. Make sure it’s a pic that you personally enjoy as well.
We recommend using contrasting pics where you don’t need a magnifying glass to make out what’s in the picture. Some specs for profile pics on Instagram (if that helps)
- 1:1 aspect ratio
- At least 110 x 110 pixels
You can always change it, so don’t be afraid to mix it up and experiment with a few options. For business profiles, Buzzvoice strongly recommends using your logo against a contrasting background. For personal profiles – pick a fun photo that resembles you as a person and shows your good sides. Make sure your face is visible. It’s just better that way. Regardless of whether you’re a personal or a business profile, take a look at your profile from a browser to make sure that your profile picture looks nice on a desktop screen as well.
Some great examples of profile pics
Changing your profile picture on the Instagram app
- Open the Instagram app
- From the bottom menu, click on the right-most tab which is your profile
- Tap on the centre-located wide white button which says ‘Edit Profile’
- Find the ‘Change profile photo’ text option, highlighted in blue and click on it
- Select one of the options for your new profile picture
- Import a picture from Facebook
- Take a photo with your phone/tablet camera
- Choose a picture from your library
- Regardless of which source for the image you select, proceed to pick out a photo and make it your profile picture.
You can also do that on a browser. Open your profile and find the top-centre located ‘Edit Profile’. Find the same option for changing the profile picture and select an appropriate image.
Filling out your Instagram bio
We wrote an in-depth article on how to effectively fill out your Instagram bio. This will be a short rundown of it. It’s all about making the right first impression.
Make it fun, light and easy to read. Don’t try to show your political allegiances or opinions on controversial and polarising topics. You should proofread to avoid mistakes unless it’s done for fun and you want to seem cheeky.
Emojis help with reading, and there are other interactive tools (like tagging and adding links) to help with the functionality of the bio. Buzzvoice always recommends avoiding direct copy-paste and trying at least a little to make your bio original and unique.
Here are two examples of good Instagram bios:

Very simple, straightforward, no beating around the bush.
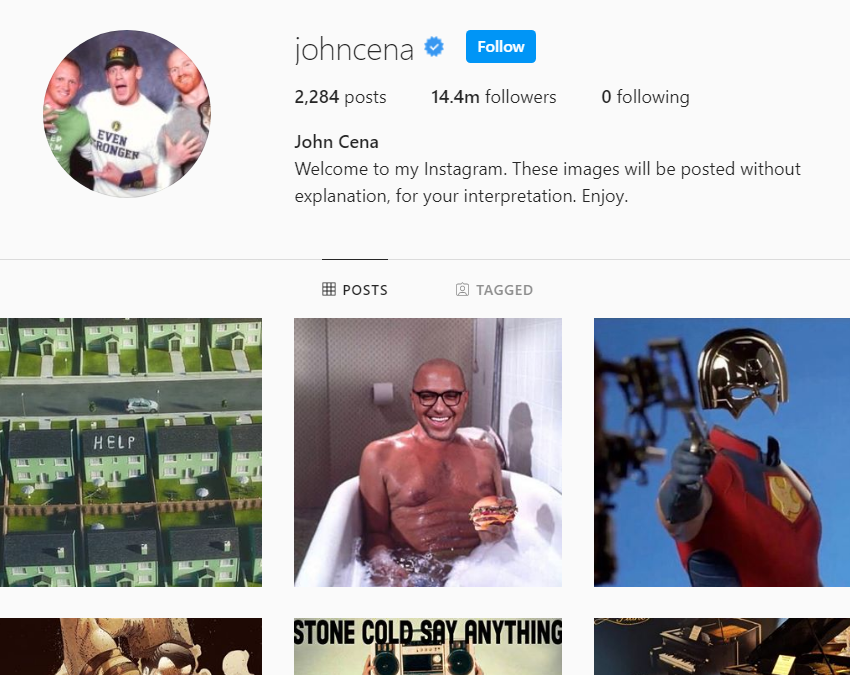
When taken into context with what John Cena posts, this is actually very funny.
If you’re interested to know more cool Instagram bio ideas, you can read the full article below.
How to edit your Instagram bio?
Editing your bio is really simple. We’ll look at how you can do it both on the Instagram app and from the browser as well.
Editing bio on the Instagram app
- Open your Instagram profile
- Click on the ‘Edit Profile’ button in the centre of your screen
- In the next screen, find the ‘Bio’ bar.
- Tap on it and write or paste any text that you wish others to see
- Click ‘Done’ to confirm your changes
Editing bio on a browser
- Open the browser and go to www.Instagram.com
- Click on your profile pic in the top-right
- You can click ‘Profile’ -> ‘Edit Profile’ or go directly to the right place by tapping on ‘Settings’
- Type or paste in the text and scroll to the bottom to find the ‘Submit’ button. Press it, and that’s it!
It won’t take you more than 30 seconds if you have narrowed down what to put in the bio. But if you need to think about it, this will take longer, we’re not going to lie. To help you out, Buzzvoice once again recommends our guide with 174 bio ideas!
Basic Tip #3 – Find people that you wish to engage with
Instagram is all about how everyone interacts with one another. So, you must start building that close circle of people you wish to engage with on social media.
Finding people to follow is simple and straightforward. You just need to know their user name and/or full name. We also published an in-depth guide on how to easily find any person on Instagram with 4 different methods. You can read it by clicking here. But just as a short rundown:
- Option #1 – Use the ‘Explore’ function (Magnifying glass icon)

- Option #2 – Find them through mutual friends (Go to a friend’s profile, click on the ‘Following’ and/or ‘Followers’ to get a broad list.
- Option #3 – ‘Discover People’ option with which Instagram makes suggestions for you to follow. These are based on your Facebook interests (if you link your account), contacts and mutual friends.
- Option #4 – Google that person.
Keep in mind that your Instagram will only be as interesting as the people you follow and engage with. This is why it’s essential to carefully choose who, what and when to follow.
IMPORTANT NOTE ABOUT FOLLOWERS/FOLLOWING people: some people are really hung up on having a ‘good followers to following ratio’. This means that they want to have a higher number of followers than the number of people that they are following. Such prejudice prevents them from engaging with a lot of content creators that they could really appreciate just because of stubbornness. Instagram isn’t about numbers. Our advice is – don’t pay too much attention to it, and try to find interesting, fun, charming, involving content that’s close to your heart. And whether you have 10 or 10 thousand followers, it shouldn’t hold you back from following anyone that seems interesting to you.
Basic Tip #4 – Share your first post!
So, by now, you should have an account that’s up and running. If you have at least a few followers (or if you wish to gain your very first ones), it’s high time you posted something. SproutSocial shared 9 great ideas for a first-ever Instagram post. They’re great starting points. While mostly business-oriented, you can take them as reference points and adapt to personal needs.
- Just a smile – if in doubt – just smile. It seems to always work out.
- Send a strong message – you can share a photo gallery or a single picture/video in your feed to send a strong message about an issue or a recent event. This can be done for both businesses and personal accounts.
- Confuse and trick audiences with cryptic messages – if you like this sort of thing, you can add something cryptic to get people riled up and going. However, chances are only a few people will notice (since you’re just starting your account), but that’s worth thinking about.
- Challenges – if you’re up for it, do a challenge that’s going around online. This will definitely catch some attention.
How to post on Instagram?
Sharing posts is really quite simple. Well, actually, it’s probably the most accessible feature to make use of. You can post from the app or use a few tricks and post from a PC/Mac as well. However, using the app is 100 times easier.
Here’s how you post on Instagram from the app:
- Open the Instagram app
- Press
 at the bottom of your screen
- An alternative: open your picture gallery/camera roll. The same applies to almost all photo/video editing apps. Click on the share button and select ‘Instagram’ from the next screen (the pic indicates how it may look on an iOS device ‘Photos’ app)

- An alternative: open your picture gallery/camera roll. The same applies to almost all photo/video editing apps. Click on the share button and select ‘Instagram’ from the next screen (the pic indicates how it may look on an iOS device ‘Photos’ app)
- In the next screen, decide what you wish to share. You have three options
- #1 – ‘Library’ – from here you can choose any picture or video that’s already in your gallery. They are arranged from newest to oldest by default.
- #2 – ‘Photo’ – This will open a minimalistic Instagram camera which is only capable of taking a picture with your front or back cameras.
- #3 – ‘Video’ – Just as with #2, it will open the same, very restricted camera but instead of snapping pics, it will record a video
- Select the content which you want to upload and press ‘Next’ in the top-right
- Apply a filter and make the necessary edits. Press ‘Next’ again.
- In the final screen you can add finishing touches to your post:
- Write a caption to your picture or video
- Tag people that also appear in your post
- Add a location tag to let your followers know where you took the picture
- Select to share your post on other social media platforms
- After you’re done – click ‘Share’

- and wait for the upload to be completed.
Buzzvoice also offers an in-depth guide for those who want to know how to post on Instagram with a PC or Mac.
Congrats! You have shared your very first post on Instagram.
Basic Tip #5 – Know how to deal with unwanted attention
You probably know that Instagram has more than 1,000,000,000 (that’s a billion) users. This means that you can interact with almost 1/8th of the entire population of the world on this platform. This is a supremely useful advantage for networking, personal relationships, personal improvement, broadening your horizons, etc.
On the other hand, you do have to watch out for bots, trolls, scammers, hackers, etc. They aren’t too difficult to spot, and they aren’t all that common, but you should always be on minimal alert and view some offers and some posts with a teeny bit of scepticism. Anyway, here’s how you can handle and manage unwanted or annoying attention on Instagram.
Block them
Blocking is just what it sounds like. If you aren’t ready or willing to put up with something from a particular Instagram user – block them. This will immediately end all possible communications between your two accounts.
Here’s our article on how to block someone and everything there is to know about Instagram blocks, restrictions, etc.
Mute them
This is an effortless way to eliminate someone’s posts from your feed. If you want to mute someone, you need to follow them. After muting, their posts and stories will not be appearing in your feed, but you can check it out when you desire to do so.
Unfollow them & remove them from followers
If you are a private account, and you don’t want to interact with someone on Instagram, you can merely remove them from your followers and unfollow them as well. These actions will leave a particular user without any more access to your stories and feed posts. However, removing them from followers (without blocking) is only possible if you have a private account.
Restrict them
Restriction is an option that’s between muting and blocking. After you mute someone, they will not see when you are online and whether you have read their messages. You won’t receive notifications about their actions, and their comments under your posts will become visible to you and the muted account (with the ability to approve them).
Report them
Reporting them is not as effective as the previous measures, but it does have some value. First of all, reports might attract the attention of Instagram customer support agents that might ban the account entirely if it’s proven to be a troll or someone who is breaking the terms & services of Instagram. However, if you don’t block or restrict them in other ways, reporting might take quite a long time to become in effect.
The app won’t notify other people that you did any of this. So, this is a very secure and fuss-free way to remove any unwanted attention.
Basic Tip #6 – Optimise the app to suit your needs
You can change the look of Instagram as well as take advantage of some features to make your in-app experience much more enjoyable. Here are some features that come in as helpful.
Dark mode
If you don’t enjoy the standard Instagram interface with the white background, you can always enable ‘Dark mode’ on your phone, and the app will change accordingly. This can create a more focused approach, so to speak.

Set a daily reminder
If you are afraid that being on Instagram might force you to waste too much of your own time, you can set daily reminders to notify you when you use the app for too long. This works very straightforwardly. You first set a daily time limit for browsing on Instagram. After you spend that amount of time on the app, you will get prompted with a notification which will inform you that you’ve been occupied with IG for a while. This helps when you want to get more work done or spend less time on social media.
Enabling daily reminders
- Open your profile on the Instagram app
- Click the
 icon
icon - Press
 – ‘Settings’
 - In the following menu screen, press ‘Your activity’ which is the second option from the top
- Find the ‘Set daily reminder’ text bar in the next screen and click on it
- Use the slider menu to pick an amount of time, after which you should be notified
- Once satisfied, press ‘Set Reminder’ to confirm your choice
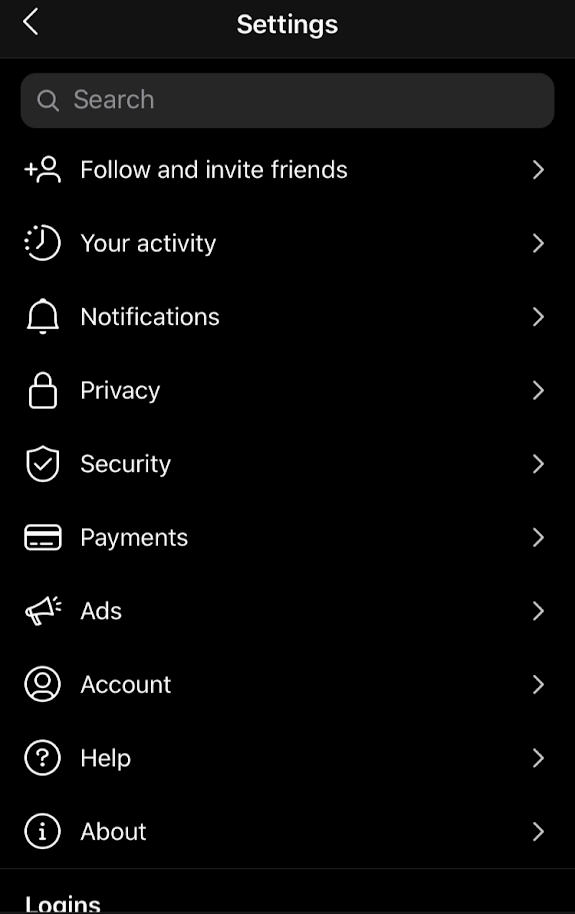
1. Click on ‘Your activity’ 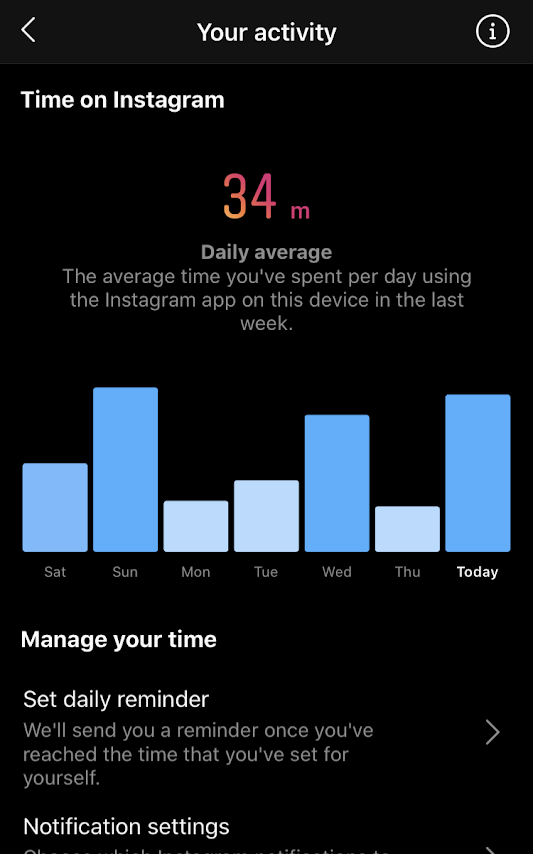
2. Now pick ‘Set daily reminder’ 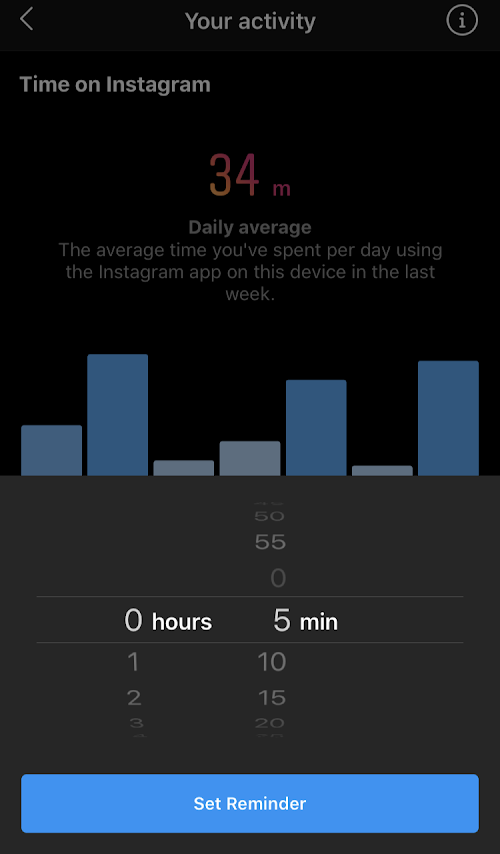
3. Choose a time for daily usage
After you spend the said amount of time, the app will notify you immediately. Here’s how the notification looks like (below).

Customise notification getting
Not everyone enjoys getting push notifications about everything that Instagram deems to be important for you. We recommend that you look over the notification settings. They can be found in ->
(Settings) -> Notifications. In that screen, you can adjust what can trigger a push notification, enable Email or SMS notifications as well as stop all notifications altogether. This is a simple way to optimise usage of the app without having too much disruption during work or leisure.
Add two-factor authentication
We strongly suggest enabling two-factor authentication to secure your account. If it contains any payment information or valuable business contacts, it would be a shame to lose it or if someone hacked it, right? This is why you should not waste any more time and turn on two-factor authentication for your login. Here is the way to enable it:
- Open your profile
- Click the three-striped icon in the top-right
- Select ‘Settings’
- Then click ‘Security’
- In the following screen, look for ‘Two-factor authentication. Click on it.
- Now you have to choose a security method. There are two alternatives:
- Authenticator app (recommended) – a third-party app that generates random codes (Google Authenticator is the most common choice)
- Text message – when logging in, Instagram will send you a text with a code
Now either set up your connectivity with an authenticator app
Or enter your phone number and proceed with the setup.

1. Pick ‘Security’ 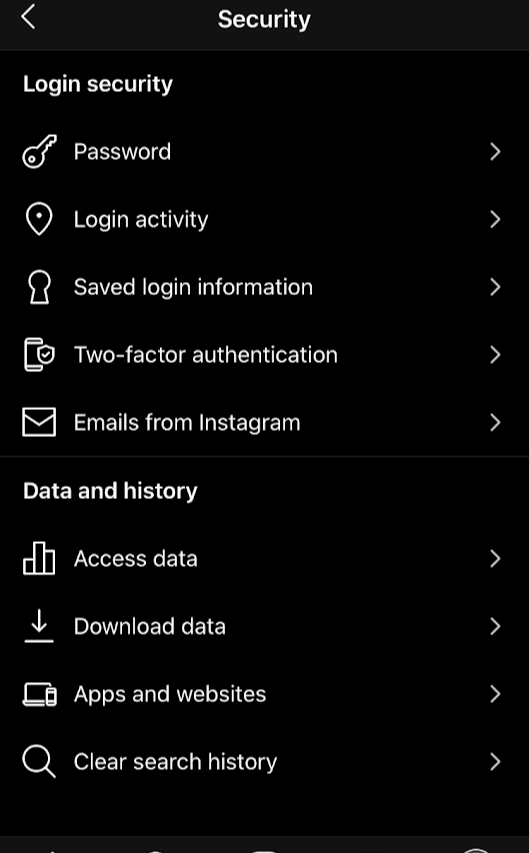
2. Tap ‘Two-factor authentication’ 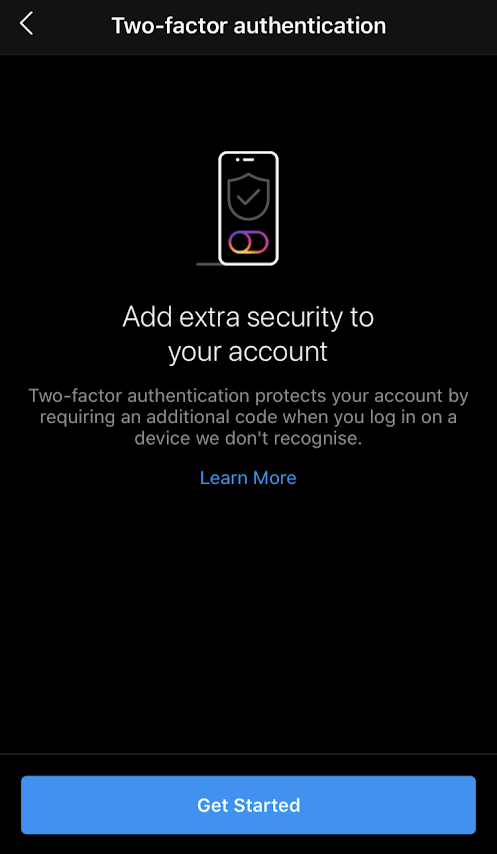
3. ‘Get Started’ 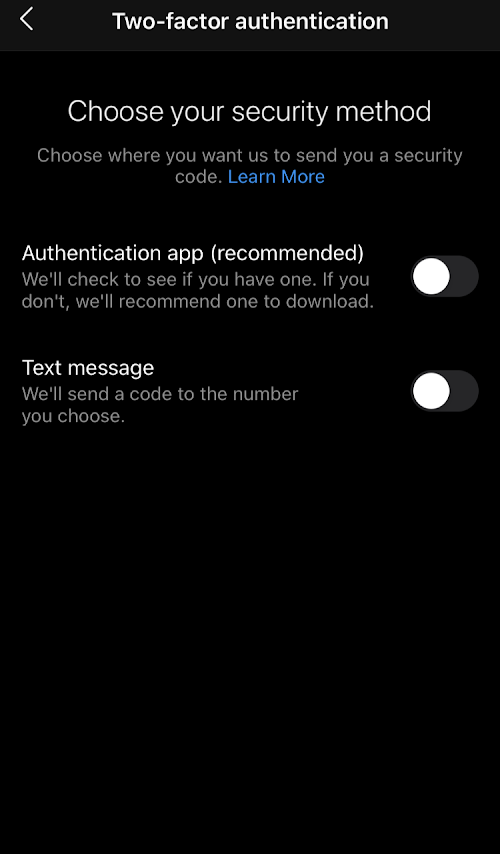
4. Select your method of choice 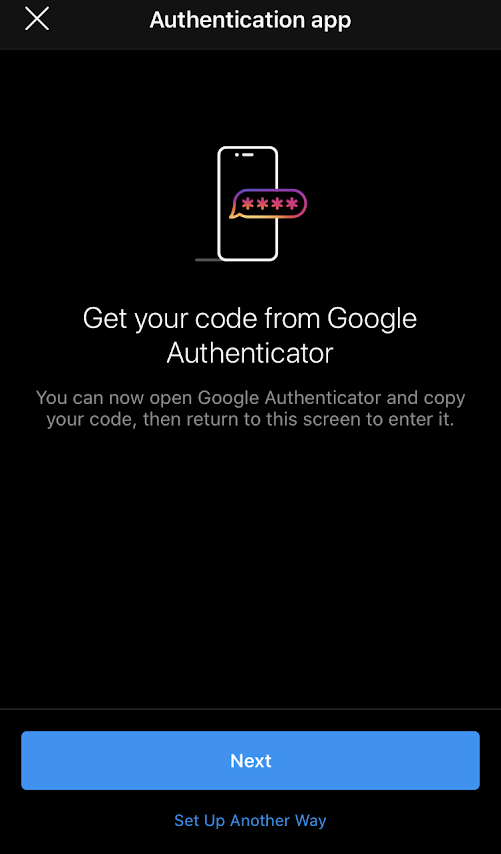
5.1. Synchronise IG with Google Authenticator 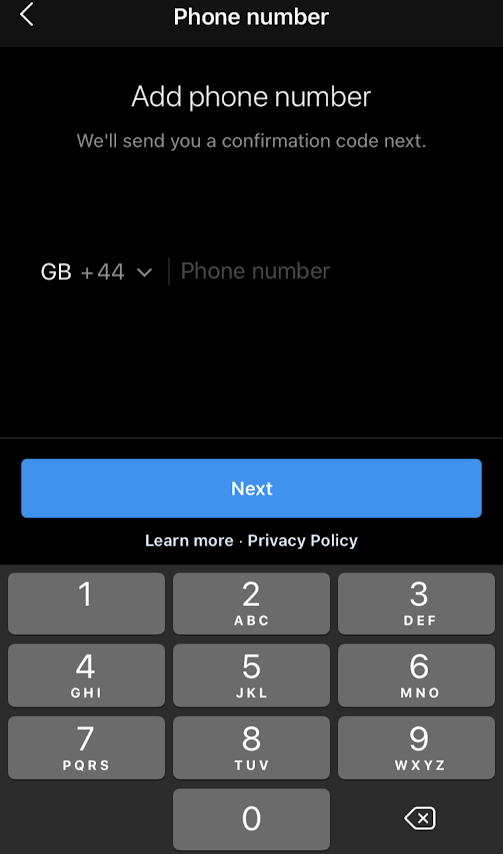
5.2. Insert your phone number and wait for the code
After you have completed that – two-factor authentication is enabled and your account becomes a lot more secure.
Save your payment method
This is only applicable to our American readers. As of now, Instagram shopping only works in the United States. So, if you’re from the Land of the free and the brave, add your credit card, debit card or PayPal and pay for purchases made on Instagram with ease.
- Click the three-striped icon in the top-right
- Select ‘Settings’
- Tap on ‘Payments’
- Tap ‘Payment methods’
- Select ‘Credit or Debit Card’ or use PayPal to add a payment method
After this, we recommend returning to the ‘Payments’ screen and creating a security PIN number for quicker, but more secure checkout. The PIN needs to be 4 digits and will provide a more fluent and safe purchasing experience.
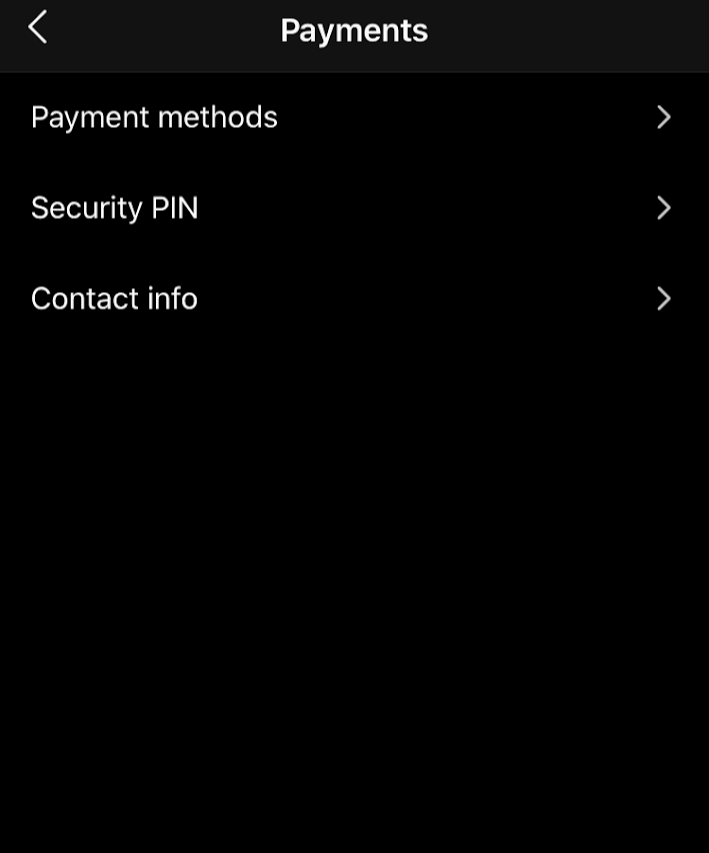
1. ‘Payment methods’ 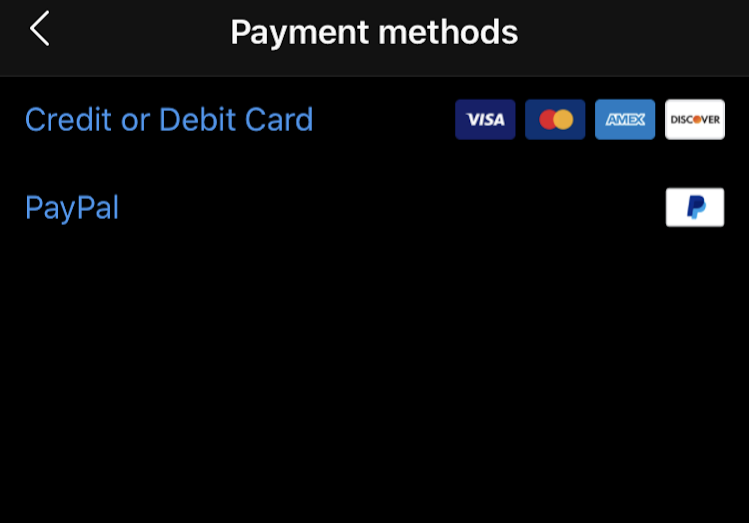
2. Add a Card or PayPal 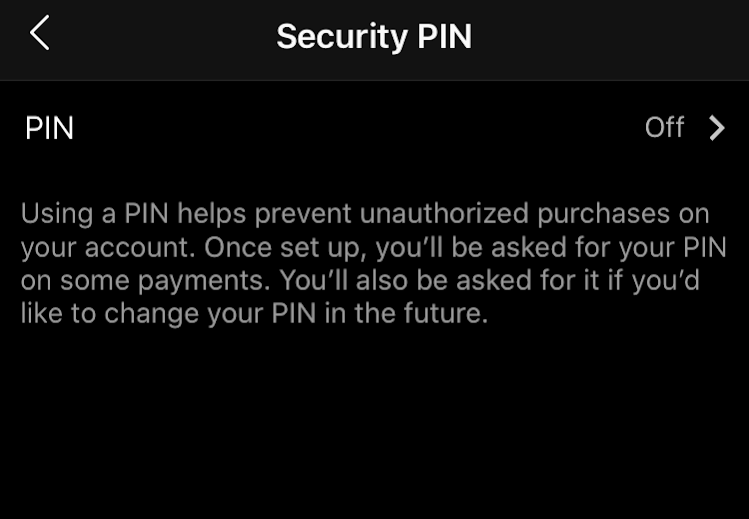
OPTIONAL: Create a PIN code
Adjust Mobile data use
Instagram allows you to enable conservative mobile data usage. This way, Instagram will load posts slower but use up less MB and GB of your precious data. Enabling this feature is very trouble-free.
Open (Settings) -> Account -> Mobile data use -> Toggle ‘Use Less Data’

Create a list of Close friends
Having a list of close friends is really awesome and handy when you want to share an inside joke, or when you wish only a very distinct group of people to see your Instagram stories.
There are two ways to add people to Close Friends. The only condition is that they are currently your followers.
Adding people to Close Friends:
- Open your profile and tap on this
 icon
icon - Select ‘Settings’

- Click on ‘Account’
- Select ‘Close Friends’
- Search for people that you want to add to Close Friends by using the search bar or scroll below to find other followers in the ‘Suggested’ tab.
Now before sharing an Instagram story with your followers, you will be able to select whether you want all of them to see it or just your close friends.
Basic Tip #7 – Get followers
With the last tip, we would like to encourage you to be active and get more followers. Regardless of why they follow you, it’s almost always better to have more than less. You should network and connect because this enables anyone to create a positive environment around them with support and room for growth. With more followers also comes more opportunities, for example – to start a business or to make a career switch and become an influencer, etc.
The best-known, but definitely the most challenging way is to do it organically. You need to optimise your video, photo and other content to make it attractive for all types of users. Here are a few of our in-depth guides that will help you out if you’re interested.
- What to post for more likes on Instagram?
- Tips for making better Instagram videos
- General advice for boosting engagement rates
- Growing the number of followers (a comprehensive guide)
On the other hand, BuzzVoice also offers a ton of Instagram services for those account owners who wish to grow on Instagram a lot faster. This is a great way to get ahead. You can buy likes, comments, views, followers or even automatic engagement at killer rates. Check it out!
Basic Instagram features and how to use them
Before we wrap things up, we feel like there’s one more thing left to cover. And it’s quite a big one. Instagram has a lot of very different, very unique features that you need to be familiar with. We rounded up 11 most important Instagram features that you should know. Here they are and a bit on how you may use them to boost your experience on the platform.
Liking and commenting posts
Likes and comments are the driving force behind Instagram. These are used sort of like a currency on this social media platform. The more likes and comments (or engagement) a post gets, the more it is likely to be shown in the ‘Explore’ menu and suggested to other users.
How to like a post
Liking a post is really simple. The easiest method is to double-tap the screen. A large white heart icon should appear, indicating that you’ve liked the post.

Double-tapping works with every post on Instagram, whether it be a regular post, an IGTV video, Instagram Reels video, etc.
One more way to like Instagram content is to click the heart icon right below the post. It is always conveniently positioned on the left side. Tap it below any post, and you will have pressed like. As an indication, the icon will be filled. It will turn red if you like a regular post or a Reels video or get a white fill if it’s an IGTV post

– for regular posts
 – for IGTV posts
 – for Instagram Reels
How to comment a post
Commenting is a way to let the author know something about their post. You can share your joy, frustration (just don’t go overboard), excitement, encouragement or pretty much anything else in the comment section.
Commenting a post is relatively simple. After you find a worthy piece of content that you’d wish to comment on, click on the bubble icon ![]() next to the heart-shaped ‘Like’ icon to open the comment section. In there, type on the blank space with the text ‘Add a comment *Your Username* and begin typing. After you’re done, click the ‘Post’ button
next to the heart-shaped ‘Like’ icon to open the comment section. In there, type on the blank space with the text ‘Add a comment *Your Username* and begin typing. After you’re done, click the ‘Post’ button ![]() and share your comment. You can either type plain text, add emojis or mention someone by typing @ and their username after it. Tagging will trigger their phones to show a notification, informing those users that you have mentioned them in a comment.
and share your comment. You can either type plain text, add emojis or mention someone by typing @ and their username after it. Tagging will trigger their phones to show a notification, informing those users that you have mentioned them in a comment.
Commenting mechanics are the same for all types of posts, whether it be Reels, IGTV or regular posts.
Other interaction with posts (Saving, Sending, Archiving)
Users also have the ability to interact with posts in a variety of different manners. There are three other features and functions worth talking about.
Saving a post
Saving is an option to add a post to a specific folder where it will be stored. This way, you can collect important updates or worthwhile reads for a later date. After a while, it may be hard to find that iconic sports photo or an inspiring quote. This is why you can save various Instagram posts when you don’t have the time to read them or when you know that they’ll come in handy later.
Saving a post is simple. Click the save icon![]() which is located on the far right of the menu located just below any post. Tapping on the ‘Save’ icon will fill it
which is located on the far right of the menu located just below any post. Tapping on the ‘Save’ icon will fill it ![]() and add it to your collections. Hold the ‘Save’ icon to choose the collection you want to add it to. Collections are just like folders for saved posts. They are convenient if you save more than one sort of posts. For example, one collection could be made exclusively for funny videos. In contrast, another collection could be labelled ‘Sports’, and contain only posts that relate to sports.
and add it to your collections. Hold the ‘Save’ icon to choose the collection you want to add it to. Collections are just like folders for saved posts. They are convenient if you save more than one sort of posts. For example, one collection could be made exclusively for funny videos. In contrast, another collection could be labelled ‘Sports’, and contain only posts that relate to sports.

Finding saved posts is really simple too. Go to your profile and tap![]() . Now select ‘Saved’ from the next menu that appears and select the collection.
. Now select ‘Saved’ from the next menu that appears and select the collection.
Sending a post
If you want to share a post with a friend, a colleague, a group of friends or just add it to your story, you need to ‘Send’ it. Sending is really simple. All you need to do is to click this icon
![]() below a post and select the Instagram users with who you wish to share it or add it to your story.
below a post and select the Instagram users with who you wish to share it or add it to your story.
A sent post will appear in DM’s.
Archiving
If you want to hide a post without deleting it, you can Archive it. Archiving only concerns your own posts. You cannot archive posts made by other accounts.
To archive a post
- Open your profile and click on a post
- Click the three-striped icon

- In the top right to open a menu
- From the menu, select the ‘Archive’ option
Archiving a post will make it private, only visible to you. If you wish to remove a post from archive, go to your profile ->![]()
->
![]() (Archive) -> Posts (or Posts Archive) -> select the post ->
(Archive) -> Posts (or Posts Archive) -> select the post -> ![]() -> Show on Profile.
-> Show on Profile.
Shopping
Instagram nowadays is more than just a social media app where you like and comment on each other’s pics. It’s so much more. The best proof of this is Instagram shopping. It only concerns US-based users as you can only buy goods from Instagram when you are located in the United States of America.
If you want to shop on Instagram, you need to find a business that has Instagram shopping enabled. @Tagheuer @Adidas are two of many. Open their profile and click on the shopping bag icon.

This will open an interactive shopping catalogue. If you’re not from the United States, you can shop but will have to check out after being redirected to the website of the retailer. American users can checkout without leaving the app, which is a lot quicker and simpler.
Users can also save products from various stores and get back to them later.
Instagram guides
Instagram Guides are an exciting yet rarely used feature. Sometime in Mid-May of 2020, Instagram launched a feature that should help content creators devise and share easy-to-read and interactive stories as well as blog-type content. As a take to rival blogs, it hasn’t reached sky-high popularity, but it’s a handy feature that you should know about.
At first, these guides were enabled for an exclusive group of health-related content creators and organisations that were entitled with the opportunity to raise awareness and inform about how to cope with various issues related to the COVID-19 pandemic.
Guides are essentially a gallery of multiple curated posts. The posts in the guide might not necessarily be created by the guide author. Guides can contain posts from various authors. They will be bundled up into one interactive landing page – a unique feed sort of. You can scroll through, add particular pieces to your story, send it as a DM, etc.
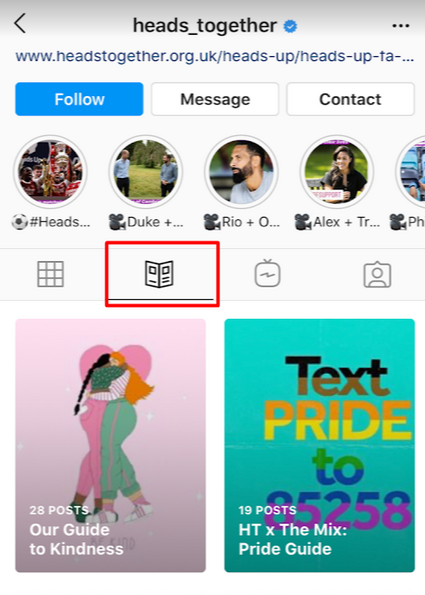
1. The icon which indicates ‘Guides’ 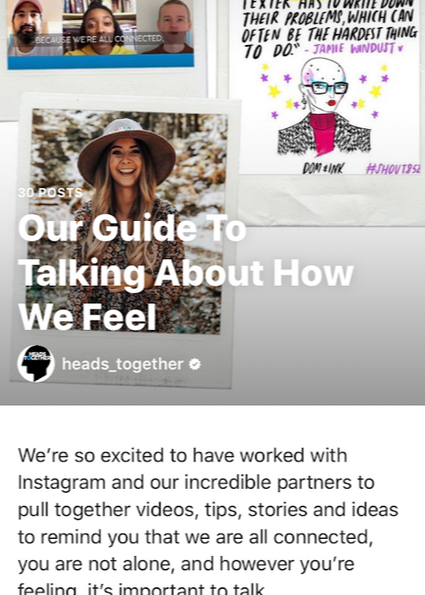
2. How a guide looks when opened
Instagram direct messages (DM)
Instagram direct messaging, better known as DM, is a popular form of direct communication between users on the app. DM’s allow two or multiple user groups text each other, share pics, videos or posts between one another. Think of it as the ‘Messenger’ for Instagram.
To open your DM interface, click the paper plane icon ![]() on the top-right hand side of your home screen.
on the top-right hand side of your home screen.
Instagram stories
Instagram stories are one of the most popular features on the platform. Instagram stories allow users to create a short interactive photo or video sequences which are only available for 24 hours. After a day, they disappear from and are only stored in a private archive of the user. Those users can then add a particular story sequence to highlights to make it visible to others.
Instagram stories are positioned in the top, above your home feed. The stories interface consists of profile pic bubbles. If a person has uploaded a story that you haven’t watched, their profile pic bubble will glow in Instagram logo colours (purplish-orange). They can also glowin green if they shared a story with close friends, and you are on that list. If the profile pic bubble has a faint grey outline, this means that you have already watched their story and they haven’t uploaded anything new.

An example of how the ‘Close Friends’ story looks (left-most) and regular stories (centre and right). 
Another example of how opened stories will look like. Notice the grey outline on these bubbles.
If you want to watch the stories – tap the profile pic bubble. This will enable autoplay of all Instagram stories from accounts that you follow. Tap on the right side of the screen to skip the current story to the next. Tap on the left side to go back. Swipe up to close all Instagram stories altogether.
There may also be interactive options like quizzes, polls, links and other goodies you can interact with. Most common are polls, quizzes, tags (mentions) and swipe-up links.

IGTV
IGTV is a feature on Instagram as well as a standalone app that allows Instagram users to share longer videos than are allowed on the feed. Think of it as Instagram’s answer to YouTube.
Content creators share vlogs, tutorials and more in-depth content on IGTV rather than in their regular feeds. Users can upload vlogs, blogs and other video content that’s up to 60 minutes in length.

Instagram Reels
Instagram Reels is the newest and freshest feature of Instagram that is set to take the social media world by storm. Instagram Reels was launched on the 5th of August, 2020, and it allows Instagram users to create, share and browse short, entertaining videos on Instagram.
Sounds familiar, right? Well yes. If you have heard of a social media app called TikTok, Instagram Reels is very similar. The launch of Reels, “coincidentally” matched with the US President’s action to ban the app for U.S. citizens very soon.
Reels can be created via Instagram camera and can be found using the ‘Explore’ menu. Instagram Reels allow users to create short videos with musical backgrounds, add cool AR effects, set a timer for a perfectly planned video, make alignment for awesome montages or change the speed of the video. So far, Reels are promising to be very popular, so get in to see how it is for you.
Boomerang & other secondary Instagram apps
If you look in your App Store, you will find that Instagram is more than just the base app. You have numerous secondary applications that serve unique and different purposes. We’ll look over them and find out why one might considering downloading and using them!
Boomerang – you can find the boomerang option in your IG stories camera. Still, the standalone app is more convenient for some users. The ‘Boomerang’ is a single-feature app which allows users to create short mini-videos that play in a looping back-and-forth motion. You can make moments caught on tape a lot more fun or capture most exciting parts of an event, gathering or your work.
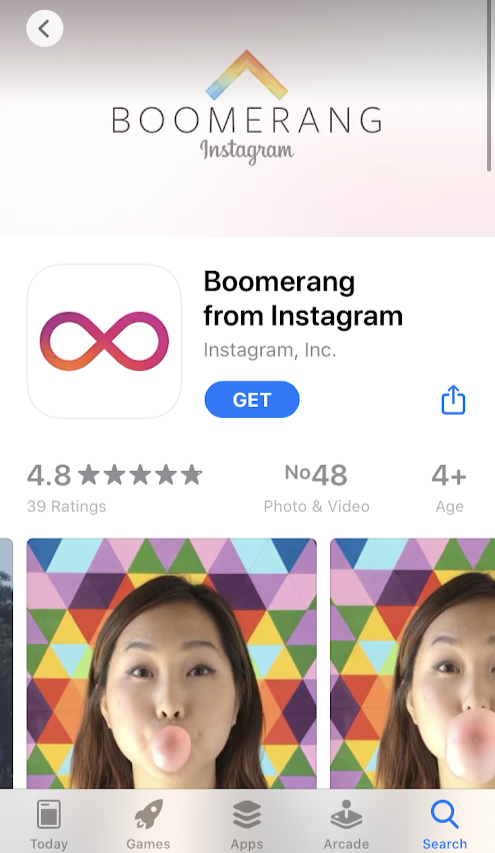
Boomerang is available on iOS AppStore and on Google Play Store as well. 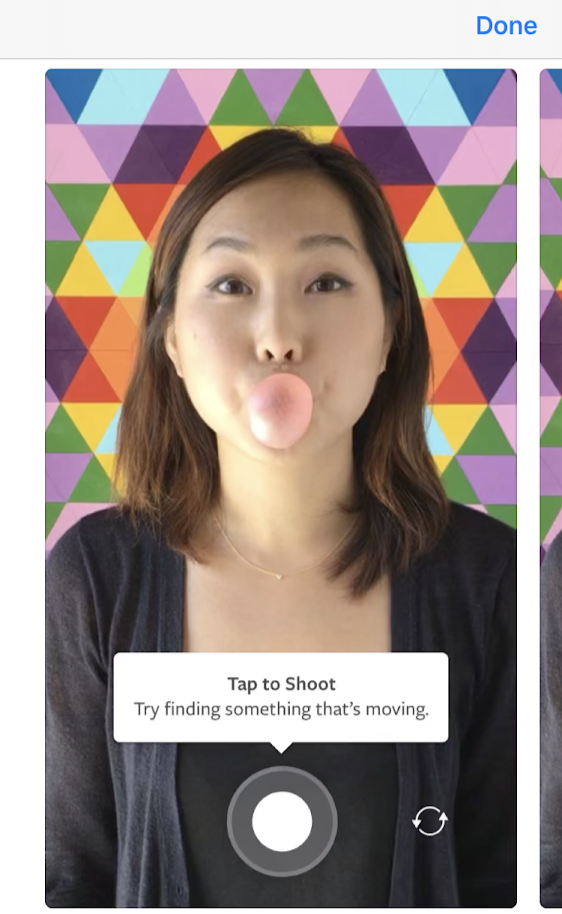
It offers a creative and fun video creation for IG users.
IGTV app – IGTV app is the standalone application for watching IGTV videos. You can do that on your regular Instagram app, but some users just seem to prefer having a separate platform for it.
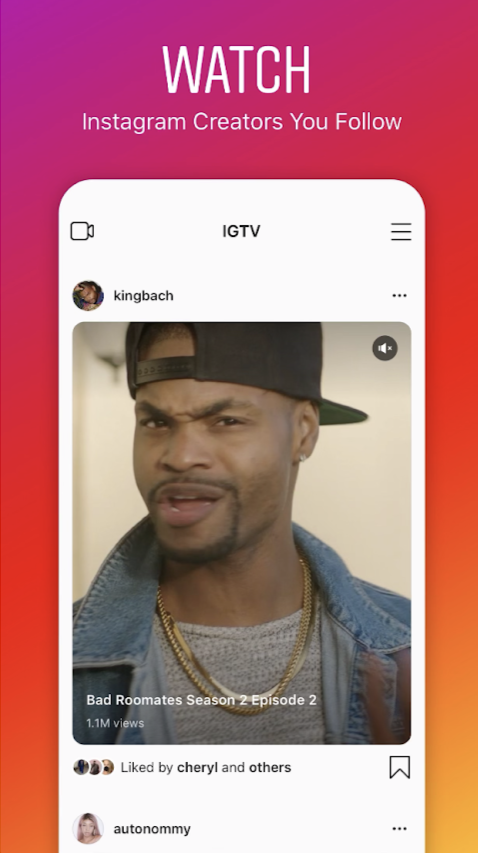
IGTV offers a way to engage with fun content. 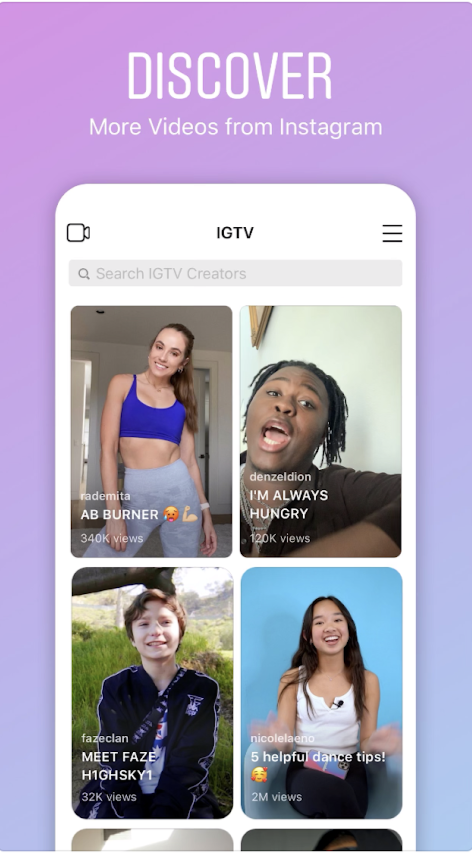
There are a lot of unique videos on the platform. 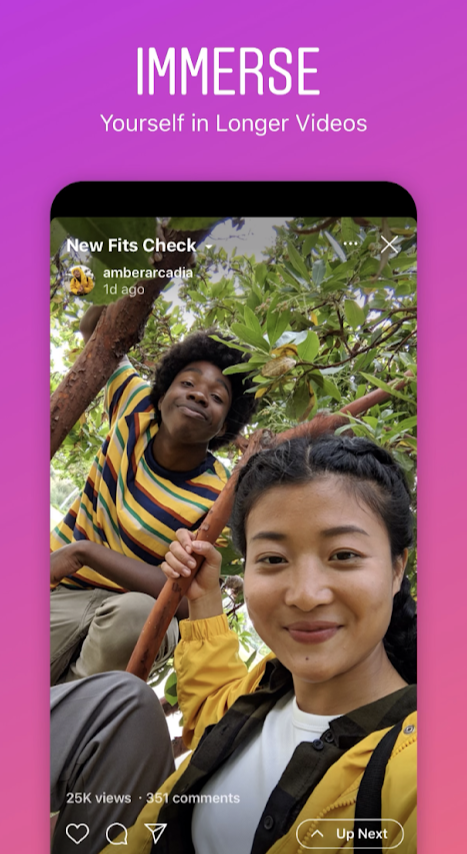
The videos are up to 60 minutes long.
Threads from Instagram – Threads from Instagram is a relatively new app that is solely focused on interactive communication between Instagram users which are in your ‘Close Friends’ list. Send photos, videos or text messages to your close friends and share status updates, etc. This is a combination of DM and Instagram camera with all perks and features. It’s entertaining, intuitive and worth to try if you chat with your friends on Instagram often.
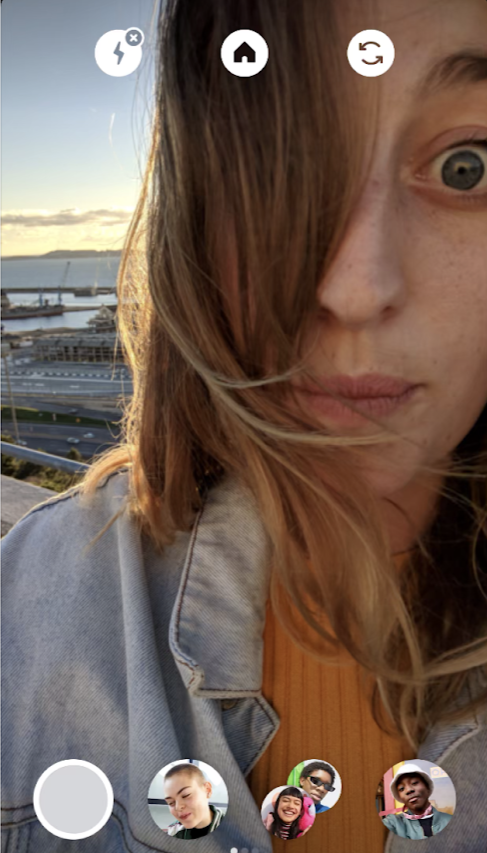
Threads is awesome for communicating with close friends. 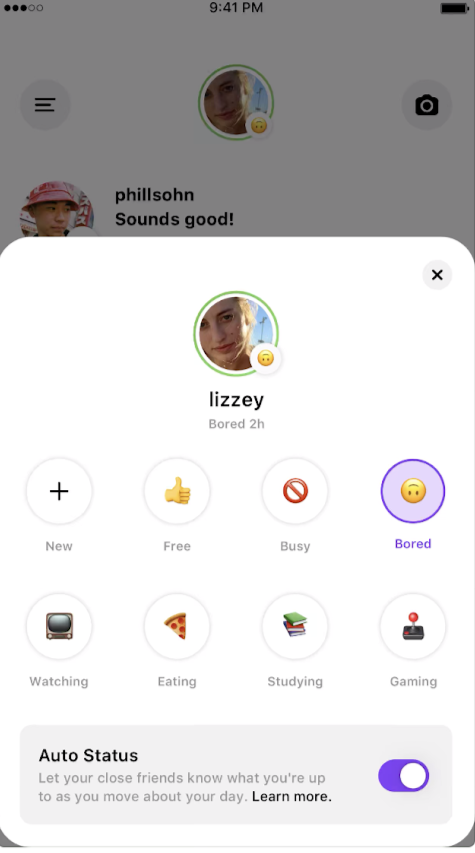
Set and customise your mood. 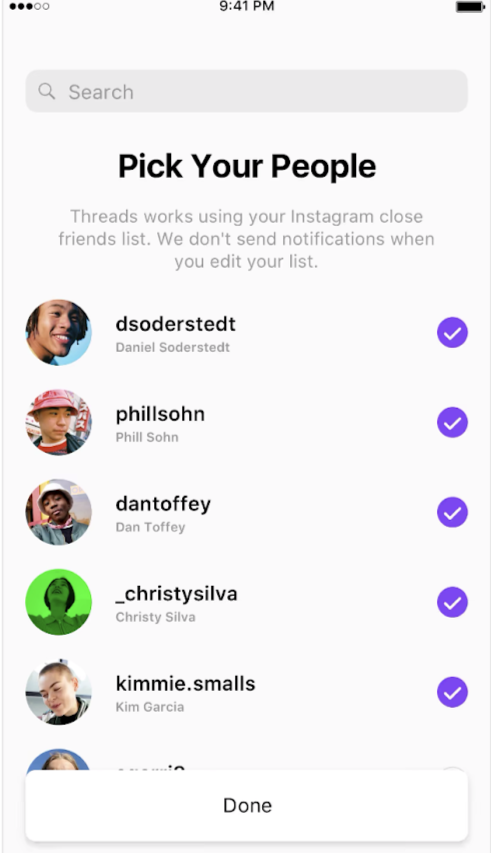
Interact with people closest to you
Layout from Instagram – Layout is a photo editing app that is focused on allowing users to create neat photo collages that they can share on Instagram. It’s convenient, but most people use it seldom.
Hyperlapse from Instagram – Hyperlapse isn’t all that well-known, but it is a video making app for Instagram. The primary purpose of Hyperlapse is to allow users to capture cool timelapse videos. With a ton of cool effects that are available, users can make them more cinematic as well.
Bonus note – in case of issues
Instagram is supremely optimised for all mobile devices. The app works almost flawlessly. However, nothing is perfect, and bugs may happen. Don’t be afraid of them as a lot of those can be easily fixed. Read our troubleshooting guide to find out more!
And that’s the whole gist, really. If you read this guide from top to bottom, you can now officially call yourself an expert in Instagram basics. Go ahead and make the most of your account!
Read next:


