How to Make Scroll-Stopping Instagram Reels [2023]
The Beginner’s Guide to Creating Fabulous Instagram Reels in 2023: Dimensions; Essentials; How To; Best Practices; Tips, Tricks, Ideas; FAQs
The age of video
The pandemic left a number of lasting legacies in its wake.
A preference for working from home, the dramatic rise in retail stock trading (meme stocks), the irascible, perennial supply chain bottlenecks (looking at you, used car dealers!).
It also rekindled the allure of bite-sized, short-form videos long consigned to oblivion after the demise of Vine.
TikTok spearheaded the resurgence. In a snap, all three of the largest social networks had their rip-offs ready to go—Instagram Reels, Facebook Reels, and YouTube Shorts.
Industry watchers had been predicting that video would be the next big thing. The wait is over!
Get cracking
The verdict is in: Users wholeheartedly embraced the new media type. In 2022, Instagram officially affirmed that Reels had become its “fastest-growing format”.
Brands and creators had to shape up or risk ceding ground to enterprising competitors.
Enough time has passed since the scramble to master this fledging format got underway.
Amidst the dismal fails and spectacular success stories, we have intently gleaned and pieced together the most comprehensive resource on how to make jaw-dropping Instagram reels that instagrab attention, nurture a vibrant community, and produce outstanding marketing results.
We distill relevant details into succinct and easy-to-follow snippets, steps, and tips that you can skip right to.
Or, you can follow along as we start off with the fundamentals.
What is an Instagram Reel?
A Reel is a type of video on Instagram that is fundamentally:
- brief (bite-sized),
- vertical (fits the entire phone screen when viewed),
- not ephemeral (does not disappear after 24 hours like Instagram Stories), and
- highly discoverable
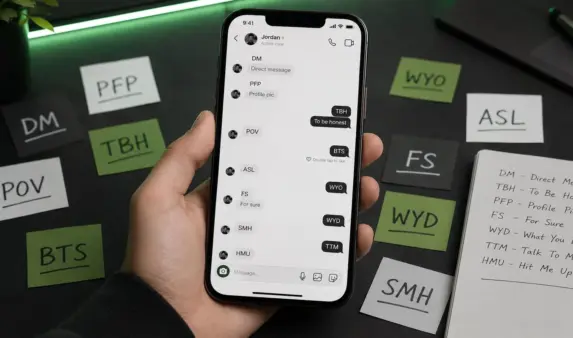
That last attribute underscores the zest of brands, creators, and marketers to adopt the format, represented by a film slate icon, ![]() .
.
Reels are an excellent avenue to reach a new, wider audience.
- Instagram users can view an endless, scrollable Reel-only feed accessed by tapping the Reel icon in the bottom nav bar of the app.
- Instagram accounts have a dedicated Reels tab.
- Reels are heavily featured in the Explore page.
- The algorithm organically promotes Reels to people who do not follow your account.
Instagram Reel Specifications
Length: up to 90 seconds (up to 15 minutes when you upload a pre-shot video)
Reel dimension: 1080 pixels x 1920 pixels
Reel aspect ratio: 9:16 in full-screen mode (4:5 in Instagram feed)
Reel caption length: 2,200 characters limit
Reel video file format: .mp4, .mov
Reel video file size: up to 4GB
Reel video frame rate: 30 fps
Cover recommended upload size; aspect ratio: 1080 x 1920 pixels; 9:16
Thumbnail recommended upload size; display size: 1080 x 1920 pixels; 1080 x 1080 pixels
Thumbnail aspect ratio: 1:1
The Essentials for Creating An Epic Instagram Reel
Tools of the trade
On a practical note, you can create, edit, and upload Reels within the Instagram app.
Reels do not need to match the production value of YouTube expositions and indie movies. The app, after years of update, is robust enough to match the needs of many brands and personalities.
With that out of the way, the option does exist to push the envelope.
In which case you’ll need:
- a recording device; your iPhone will do most of the time but a camera can come in handy
- a video editor; check out our definitive list of the best Instagram reels editing apps.
- We recommend InShot or Adobe Premiere Rush (CapCut as a free alternative and Clips for iOS devices).
Paths to creating exceptional Instagram Reels
We have established that you can create a Reel from within the Instagram app.
Or you can pre-record, then edit with a third-party editing tool. Before uploading the edited clip(s) on the app.
Both paths work.
Furthermore, it is instructive to note that unlike Stories that can comprise video, images, and boomerangs (see How to Make a Boomerang on Instagram); Reels are primarily video-centric.
You can create a Reel comprising a single clip or a mashup of multiple clips within the duration limit. In addition, you can creatively produce a video from a still image or add photos to a multi-clip Reel.
The adjustable playback time of each picture on the Instagram app is 1 to 5 seconds. Do more with a standalone video editor.
How to Create Instagram Reels: Best Practices and Editing Guidelines
The failproof approach for creating a perfect, attention-grabbing, engagement-boosting Instagram reel is to properly understand its constituent components and how to use widely-acknowledged best practices to synergize them.
1. Plan
Before you hit the record button, it pays to become acquainted with the Reel-verse.
- How do other brands, creators, and influencers use Instagram Reels to expand their reach and spread the word about their products and services?
- How can you make your Reels dovetail with other media types to craft a cohesive marketing strategy?
- What does your target audience expect from a Reel? What appeals to them?
- What quantifiable goals have you set out to achieve by sharing Instagram Reels?
To satisfactorily answer these and other pertinent questions, you will have to do a bit of research.
Thumb through the app; see what others are doing and get a feel for what works; take stock of text, visuals, aesthetics, sounds, and trends that stand out and could inspire your own efforts; and altogether develop a solid grasp of the direction you’d take.
Next, create a storyboard that defines content topics and buckets as well as tone; identifies the elements (visuals, fonts, and colors) you’ll draw on to showcase your brand identity, and zeroes in on optimizations that will forge deep connections with your customers and fanbase.
Put simply, break down your screenplay sequence into a script that lays bare how your Reels will look before filming.
2. Template & Layout
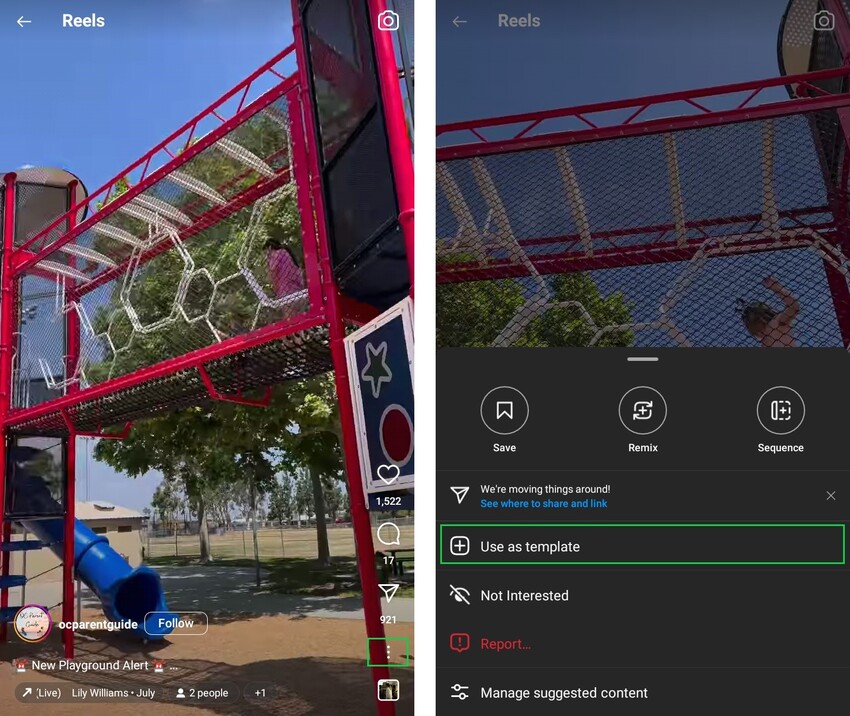
Say you find a Reel with certain qualities that you like and would want to adapt.
The native Instagram Reel maker offers the option to use an existing Reel as a fill-in-the-blank template allowing you to adopt or replicate music, clip sequences, and pacing that you’d want to apply in your own Reel.
This drastically cuts editing time, increase Reel output without sacrificing quality, and helps you hop on trends quickly.
To use a Reel as a template, tap the three-dot icon, ![]() on iPhone or
on iPhone or ![]() on Android, then tap Use as template.
on Android, then tap Use as template.
Alternatively, access Instagram’s very own library of templates by tapping the + icon ![]() at the bottom of or swipe right anywhere in your Feed. Scroll horizontally to Reels. Tap Templates.
at the bottom of or swipe right anywhere in your Feed. Scroll horizontally to Reels. Tap Templates.
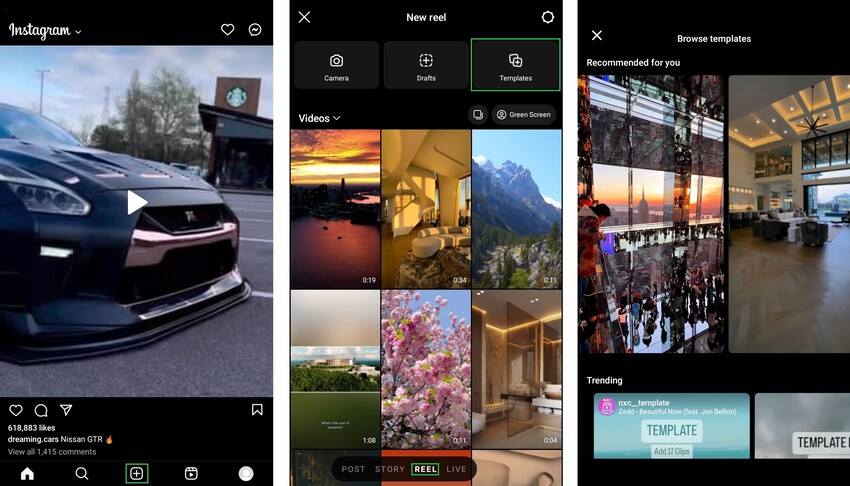
Or tap the Reels icon ![]() at the bottom and tap the Camera icon. Tap Templates.
at the bottom and tap the Camera icon. Tap Templates.
Standalone editors like Adobe Premier Rush, Canva, and VN (VlogNow) serve top-shelf, pro-grade templates that are a cinch to work with. Substitute elements as desired, touch up, and put your stamp on it in a fraction of the time it’ll take you to whip up a Reel of comparable quality from scratch.
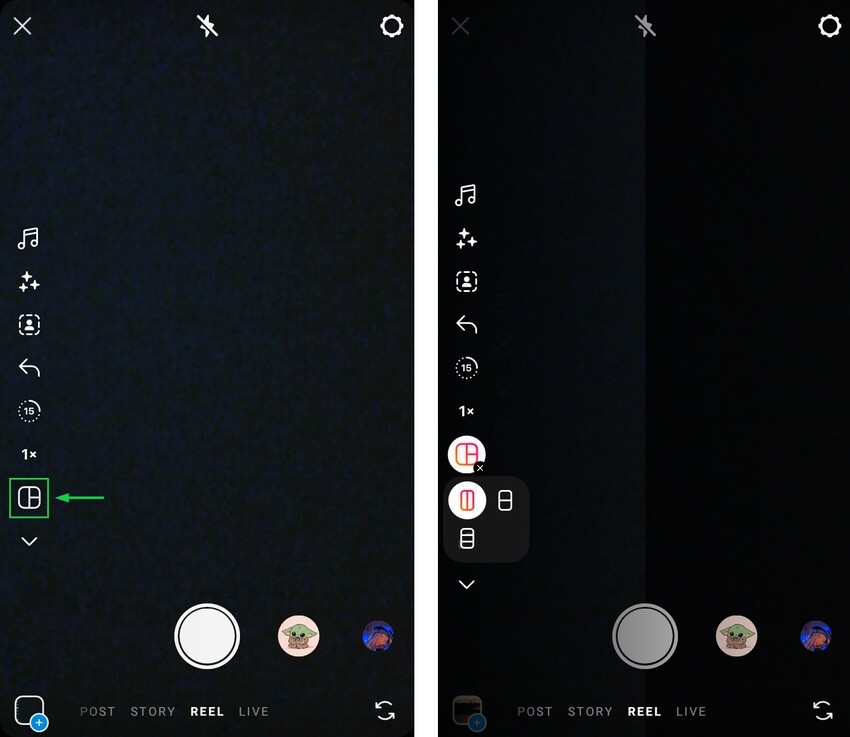
By default, Reels have a full-screen layout. On the Instagram app, you can split video layout horizontally (side by side), vertically, and even have three stacked screens.
Tap the Layout icon ![]() to access these options.
to access these options.
While Layout permits merging pre-shot or saved clips, the Remix (Instagram’s answer to TikTok’s Duet) functionality lets you make a Reel where your clip(s) play alongside another Instagrammer’s Reel.
It is a ridiculously efficient hack to react to, comment on, draw attention to, or contribute to a conversation or topic. On the Reel you want to duet with, tap the three-dot icon, ![]() on iPhone or
on iPhone or ![]() on Android, at the bottom right. Tap Remix.
on Android, at the bottom right. Tap Remix.
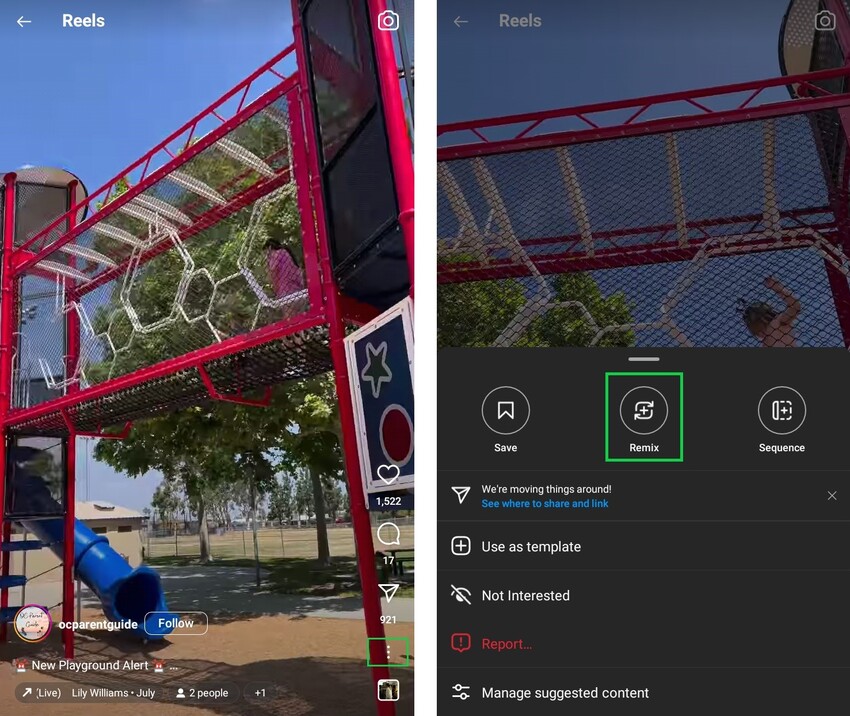
Tap Sequence (a new standalone feature formerly part of Remix) to add clips to the end of a published reel.

For picture-in-picture mode, turn to editors like FilmoraGo.
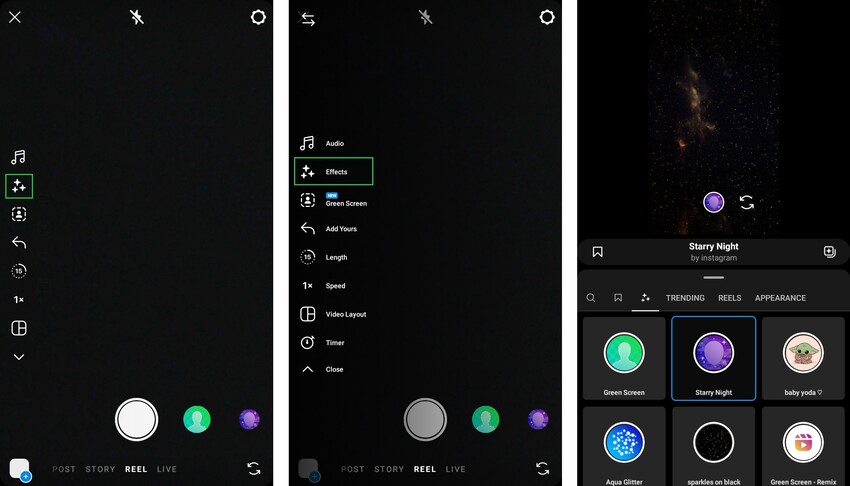
3. Filter, Effects & Elements
Filters have been an integral part of Instagram’s value proposition from the very start.
That has not diminished. And its native library of filters is on hand to add ambience to your Reels. On third-party editors, you can alternatively adjust the tone, saturation, brightness, shadows, and contrast for similar results. Not to takeaway from their respective filter collections.
Building on an already extensive array of filters is a cornucopia of effects that can be introduced to glam up your videos. Adjust the speed of playback. Apply exquisite transitions. Change the background with the green screen (chroma key) feature. And that’s only scratching the surface. AR effects have been a hit.
Elements add visual interest and dynamism. Take your pick from an inexhaustible constellation of animations, stickers, annotations (preset or use the draw tool to let your creative juices flow), and text.
On the Instagram Reel maker, tap the three-star (sparkle) icon ![]() to view and search through filters and effects.
to view and search through filters and effects.
To insert an element, select the appropriate subclass. Tap the square face emoji icon ![]() for stickers, the squiggly line icon
for stickers, the squiggly line icon ![]() to draw or annotate, or the letters Aa icon
to draw or annotate, or the letters Aa icon ![]() to add text.
to add text.

Mixing and matching from all three embellishment types create endless cinematographic possibilities. The Instagram library is plenty expansive; but video editors have exclusive, premium gems waiting to be discovered.
4. Audio
Sounds are a cardinal component of Instagram Reels.
They elevate entertainment value, provide context, and aid discoverability.
Instagram makes it incredibly easy to select a song from their curated music library (the selection for business and personal accounts is different), record a voiceover, or add sound effects.
Audio controls include adjusting the volume, splicing part of the music to apply to your video, and searching for a specific tune. Additionally, you can save the audio in a Reel you chance on for future use and check out trending tracks (it’ll have a little arrow next to the name of the audio in a Reel).
After recording your reel and tapping Next at the bottom or adding a pre-recorded clip, tap the Music Note icon ![]() for the full suite of audio functionalities on the Instagram app.
for the full suite of audio functionalities on the Instagram app.
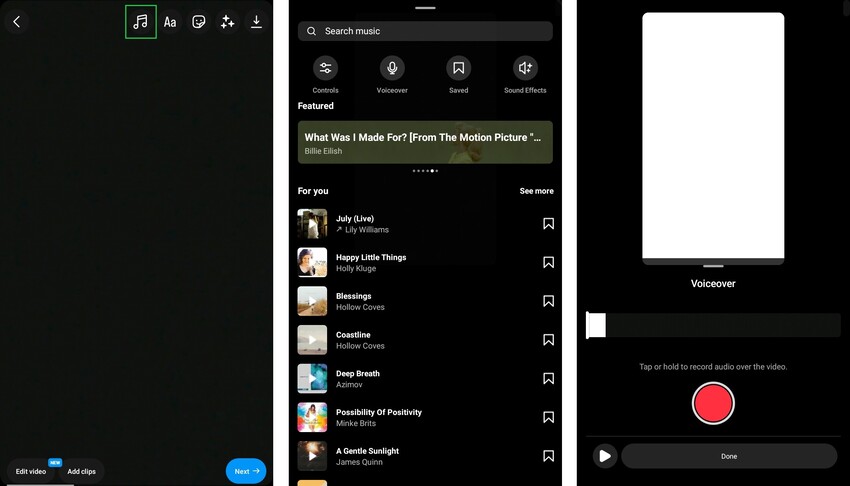
We recommend you use a popular, trending song when creating an Instagram Reel. This is a free hack for expanding your reach.
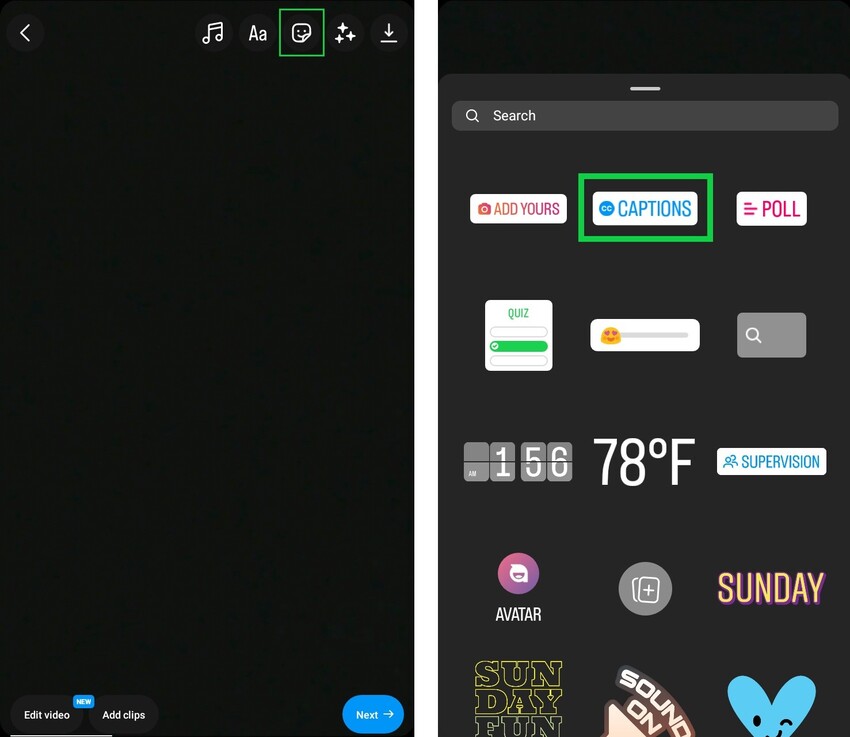
5. Caption
The caption, alternatively called timed text or subtitle, can either refer to on-screen transcriptions visible during Reel playback or the fixed descriptive text that includes a headline at the bottom of the Reel.
The former, more pointedly named a closed caption, radically improves accessibility—not everyone enables sound when watching an Instagram Reel, adds context or clarity, and can spiff up your vid with stylistic flourish.
Use the CC CAPTIONS sticker to add a subtitle automatically via Instagram speech-to-text transcription feature. Correct and customize the closed caption as desired. Change text color, style, and move it around the screen.
In addition, you can add text manually by tapping the Aa icon ![]() at the top.
at the top.
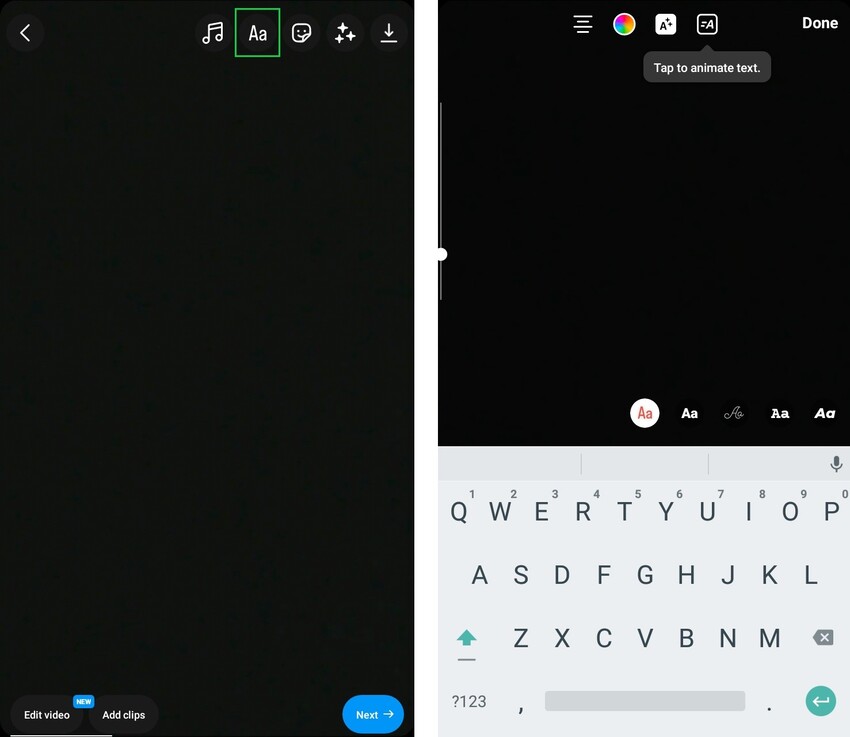
Third-party editing apps like InShot offer more customization options. Such as fonts, animation effects, and more.
6. Monetize
Return-based optimizations are often an afterthought for businesses, personalities, and influencers with myriad objectives. It shouldn’t be.
Laudably, Instagram has sought to keep up with YouTube, Twitch, and TikTok, by steadily improving and expanding access to a smattering of functionalities that directly boost the bottom line of partners who embrace Reels.
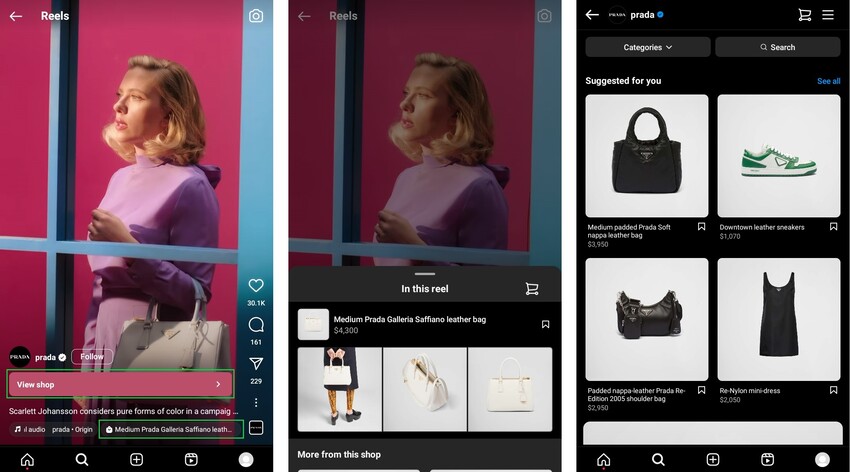
Businesses can integrate Instagram Shop listings to aid discoverability of your products.
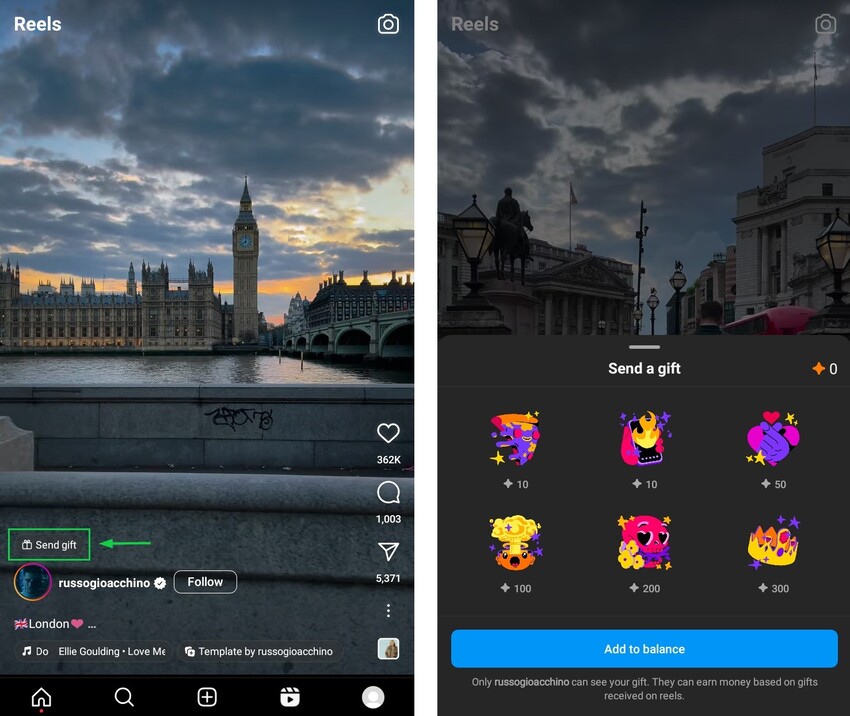
In addition, creators and personalities like authors can embed (place) ads in their reels and partner with brands as well as receive direct contributions via gifts and subscriptions.
Of course, these take nothing away from the ability to encourage your viewers to perform rewarding deeds using call-to-actions (CTA). You could insert them directly in your clip using a visual or in your captions (direct them to your bio, website, or some other preferred destination).
Bear in mind that to access most monetization options, you may have to switch to a business or creator Instagram account.
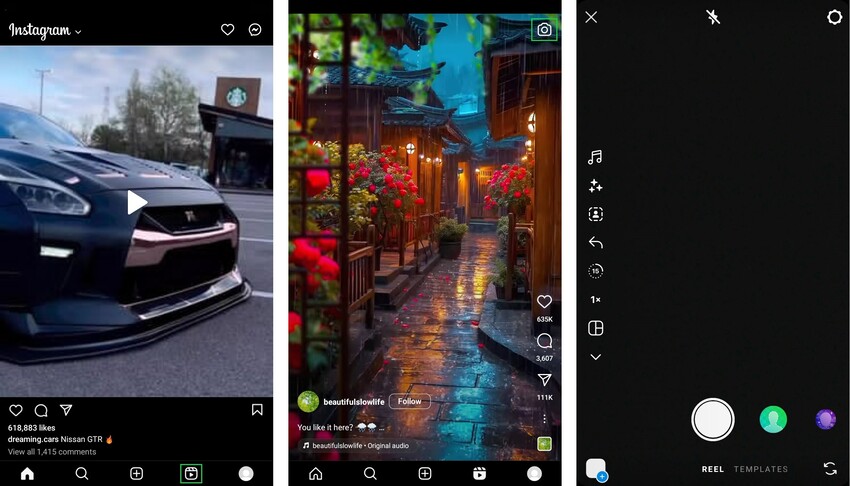
How to Post Instagram Reels
On Apps (Android, iPhone, and iPad)
- Start up the Reels editor.
- To do so, swipe right anywhere in Feed. Or, tap the + icon
 at the bottom; then, tap Reels at the bottom. Or, tap the Reel icon
  at the bottom.
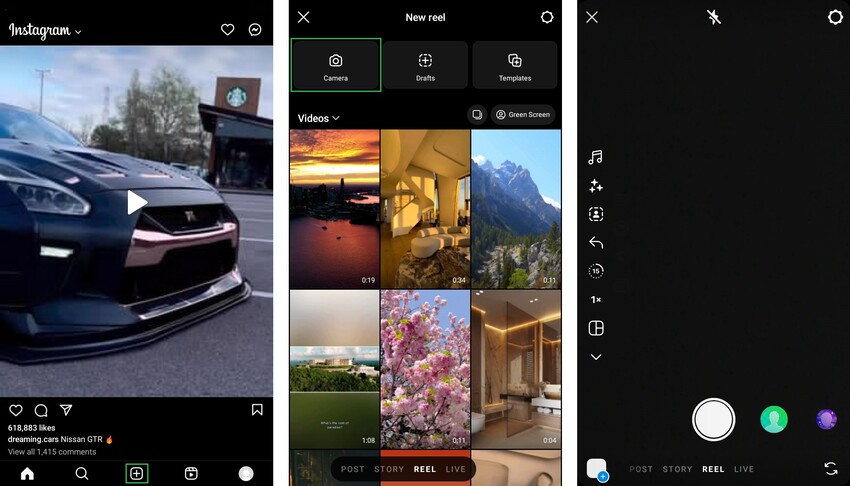
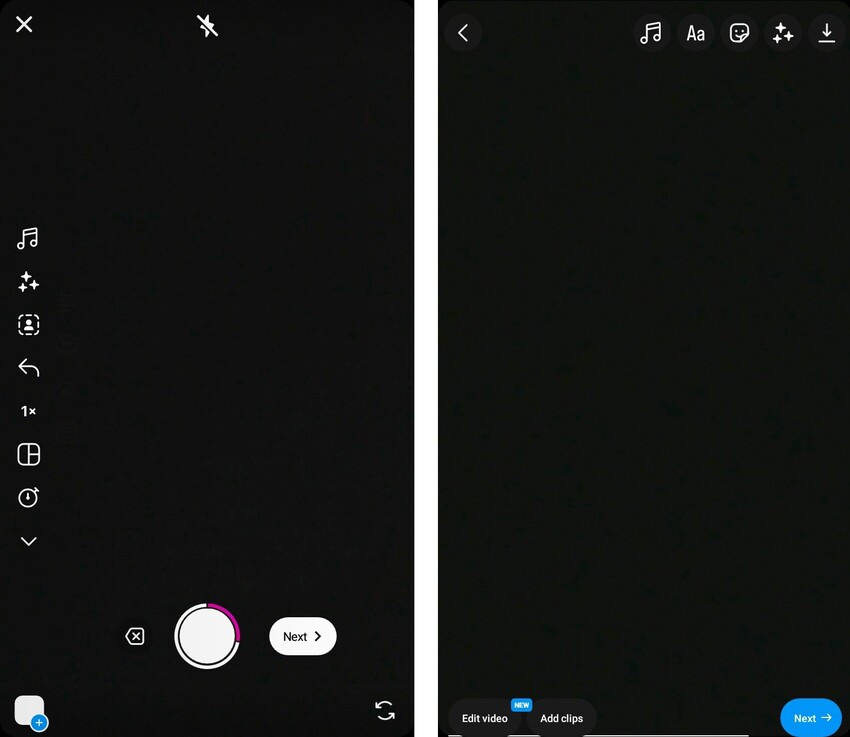
- Record and edit clip(s) by tapping and holding the prominent circle button
 .
.
- Or upload an external pre-shot and/or pre-edited clip by tapping the + icon at the bottom left.
- After recording a clip, tap the ‘Next’ button to access more editing tools.
- Edit recorded or external clip as desired by tapping ‘Edit video’ at the bottom left. Tap ‘Add clips’ to as it suggests append more clips. Use editing tools via respective icons at the top right.
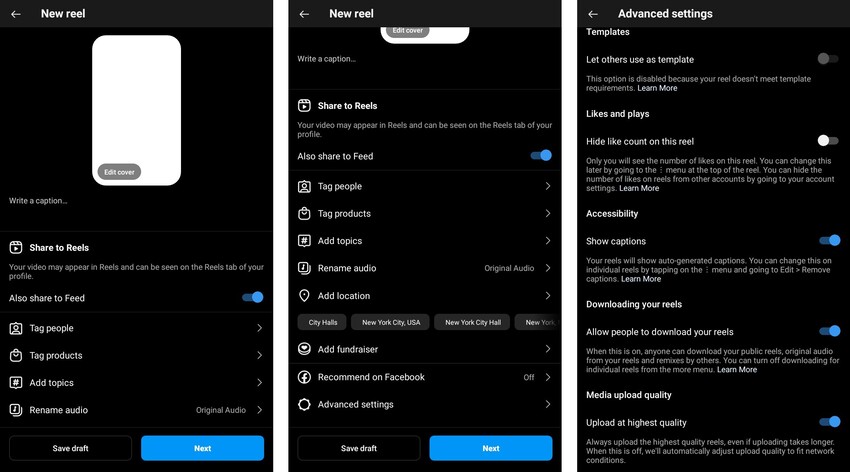
- After you are through with edits, tap the ‘Next‘ button at the bottom right to optimize the Reel on the share window.
- Optimization options include:
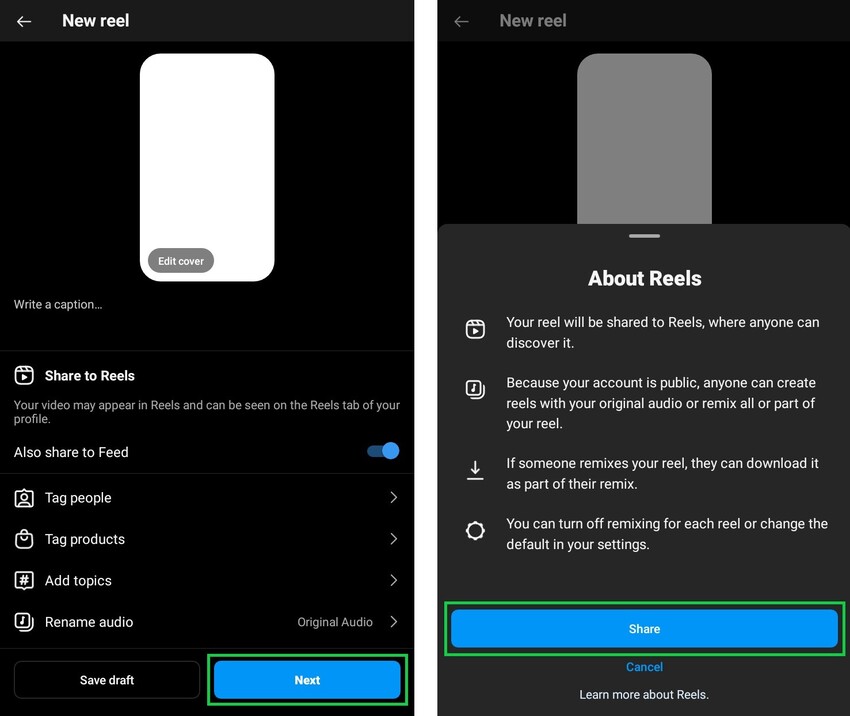
- Edit cover; write a caption; opt to share your Reel to your Feed; tag products and people; rename audio; add topics, location, or fundraiser; recommend on Facebook; and adjust “advanced settings” where you can add paid partnership label, hide like count, schedule, and more.
- Save a draft of the Reel so you do not start afresh or publish your Reel immediately by tapping ‘Next’ then ‘Share’.
On Desktop Browser (Windows, Mac, Chrome, Linux)
Yes, you can upload a reel through the Instagram.com website on any web browser on any computer.
We have reservations though, as editing tools are almost non-existent (you can select aspect ratio, trim, and not much else).
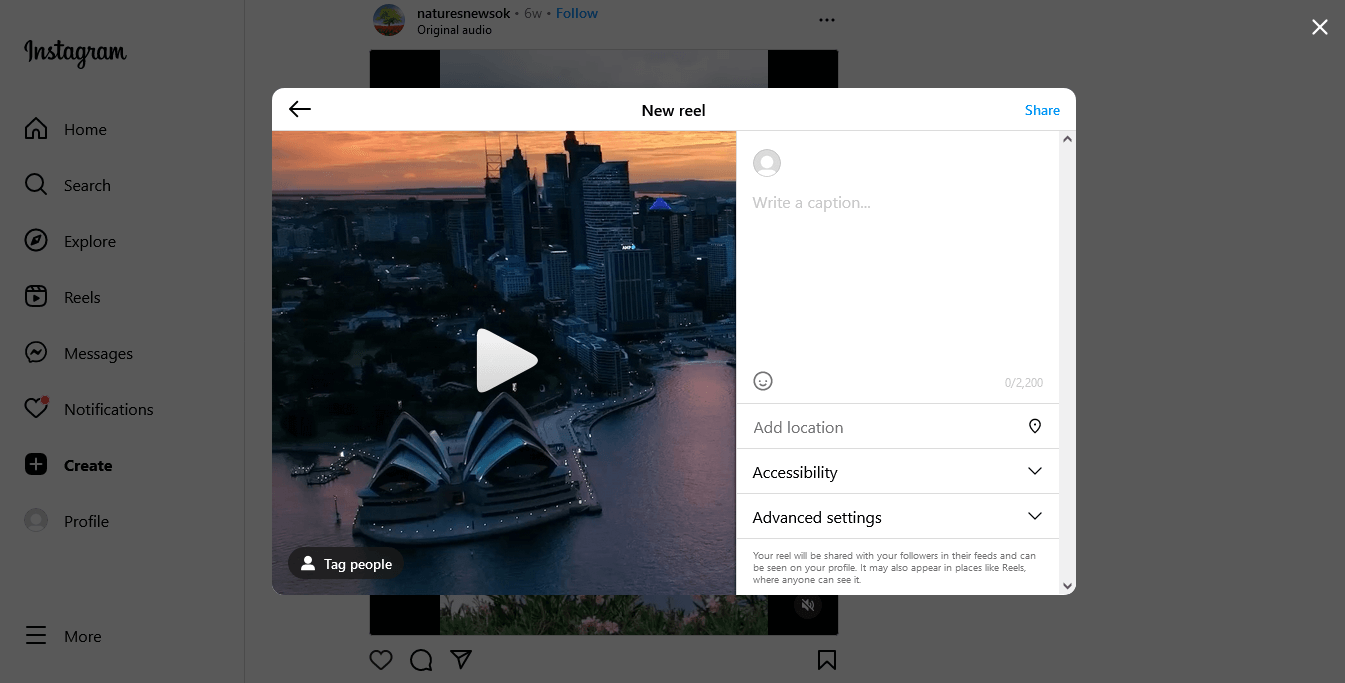
You also get far fewer optimization options besides adding a cover, writing a caption, tagging people, and a handful of other settings.
Follow these steps to post Reels from your PC, Mac or any computer OS:
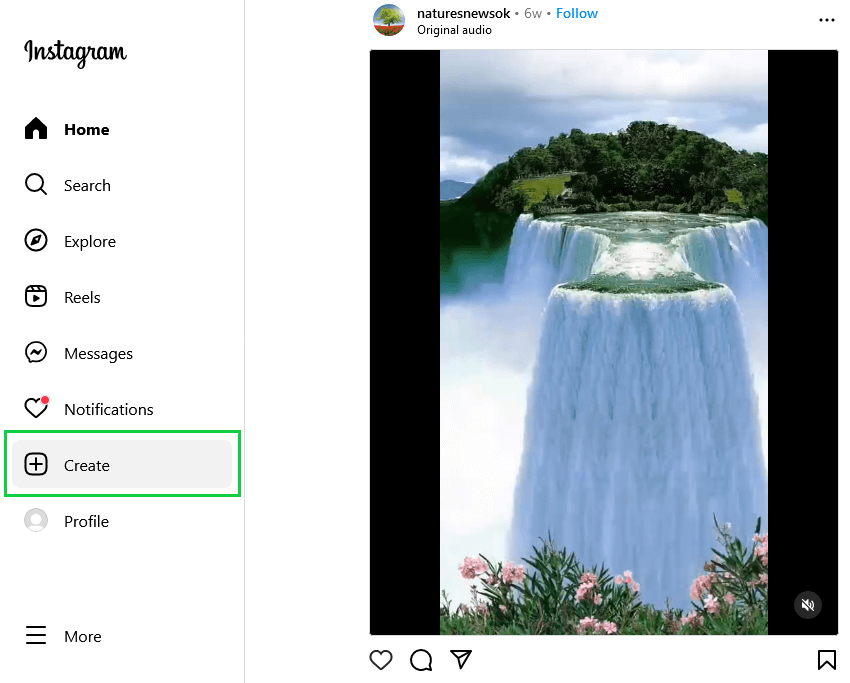
- Click Create on the left vertical menu
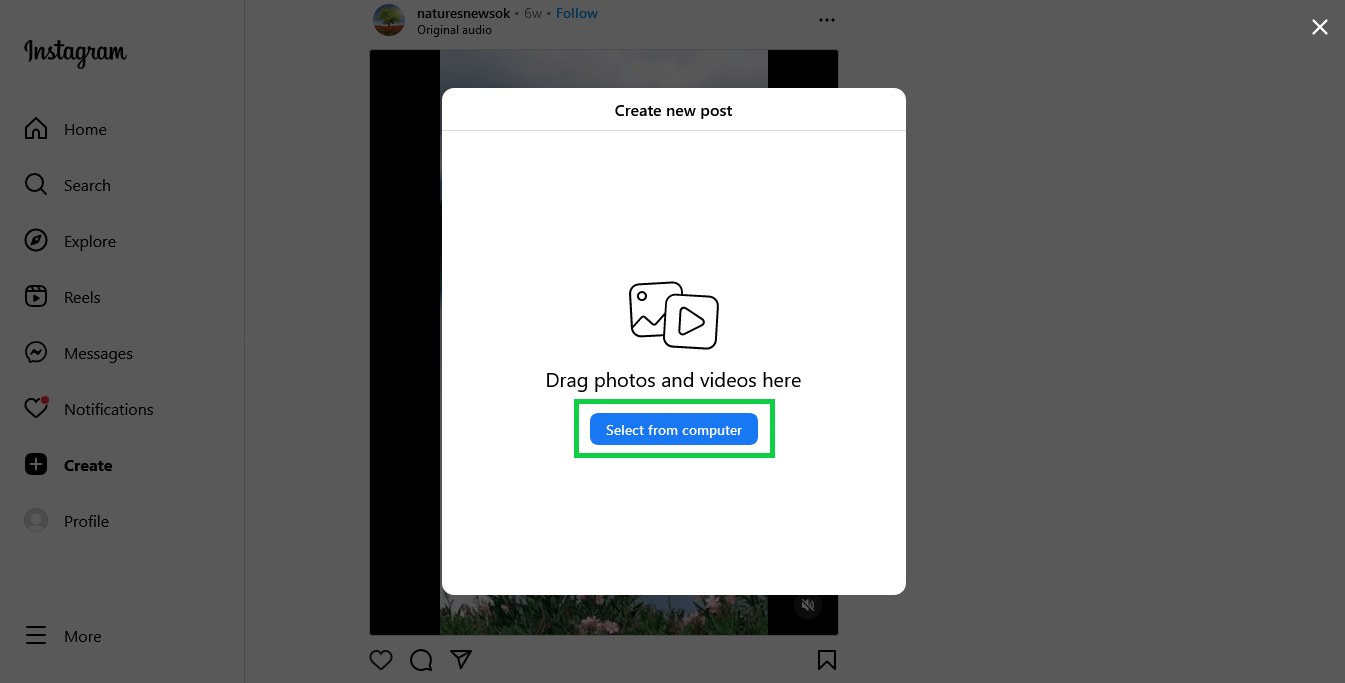
- Click the ‘Select from computer’ button or drag-and-drop a pre-edited video clip
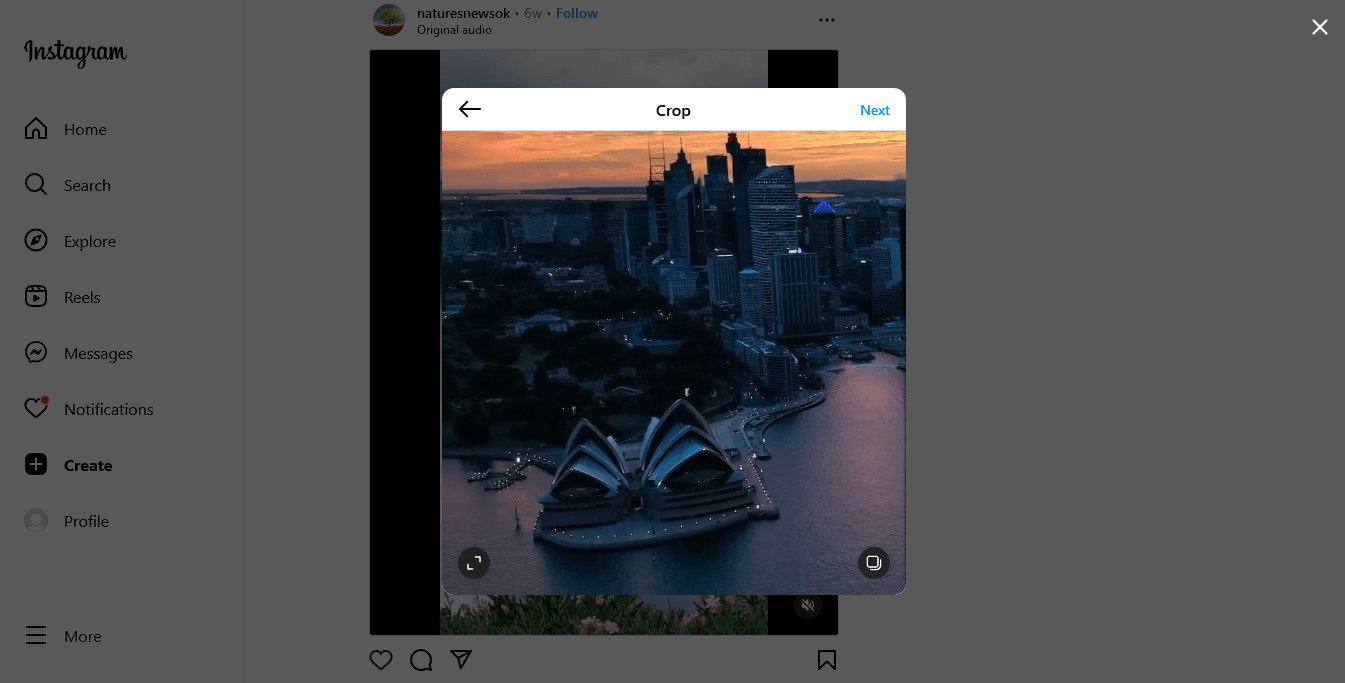
- On the Crop window, change the aspect ratio by clicking the expand (angle brackets) icon at the bottom left. Or add another clip by clicking the page icon
 at the bottom right, then click
  to add another file. Afterwards, click ‘Next’ at the top right to proceed to the Edit window.
- Perform limited edits on the Edit window – change the cover photo, trim the clip, and enable/disable sound. Click ‘Next’ to proceed to the Share window.
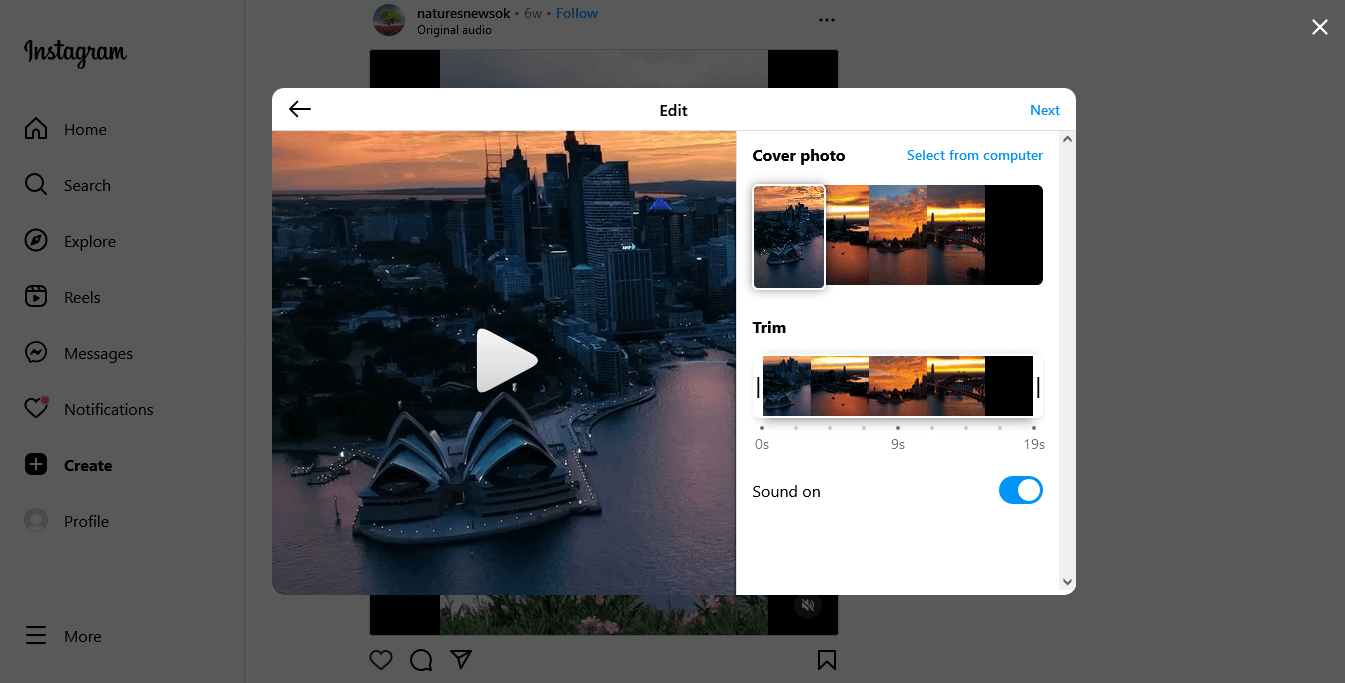
- Optimize as desired, then click ‘Share’ at the top right.
On a related note, you can use the INSSIST Chrome-only plugin as an alternative route to upload pre-edited Reels.
How to Schedule Instagram Reels
Create fab reels far in advance and specify exactly when they should be shared through Instagram’s in-app scheduler.
This is a step up from the capability to save drafts of Reels you’re making. It is a boon for setting up a content calendar and have pre-scheduled Reels ready to go at the best times when your audience is active for better reach and engagement.
The scheduler is one of the Advanced Settings you can modify after editing a Reel. Follow the steps in the How to Post Instagram Reels on Apps subsection. Tap Advanced Settings (step 5). Tap Schedule. Choose the time and date.
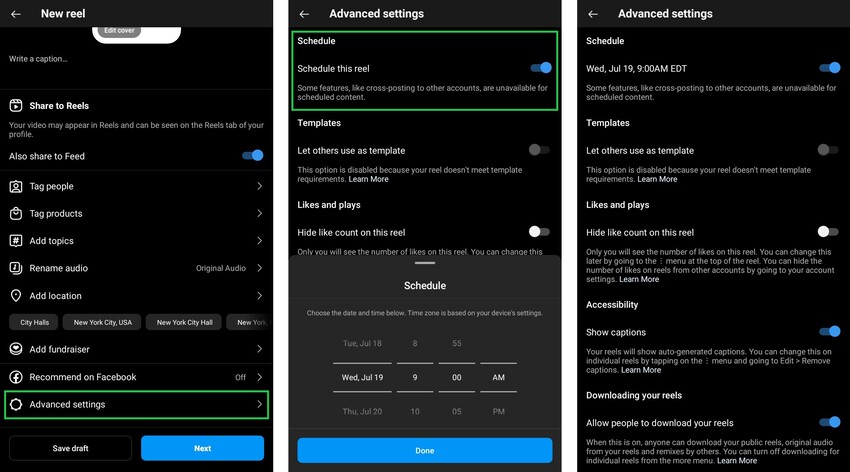
Your account must be set to professional (business or creator) to access the feature. You can schedule up to 25 posts and reels a day and for up to 75 days prior. You can also navigate to pre-scheduled Reels any time before they go live to reschedule, share now, or delete.
How to Properly Encode Instagram Reels: The Best Export Settings
On YouTube, viewers can select the exact viewing resolution—all the way from 144p to 4K.
Unfortunately, that option does not exist on Instagram. Instagram compresses videos so they load quickly and play without buffering. The tradeoff is that your Reels can look like they were shot on a potato cam or 90s security cam.
To reduce the likelihood of this happening, here are a few tips.
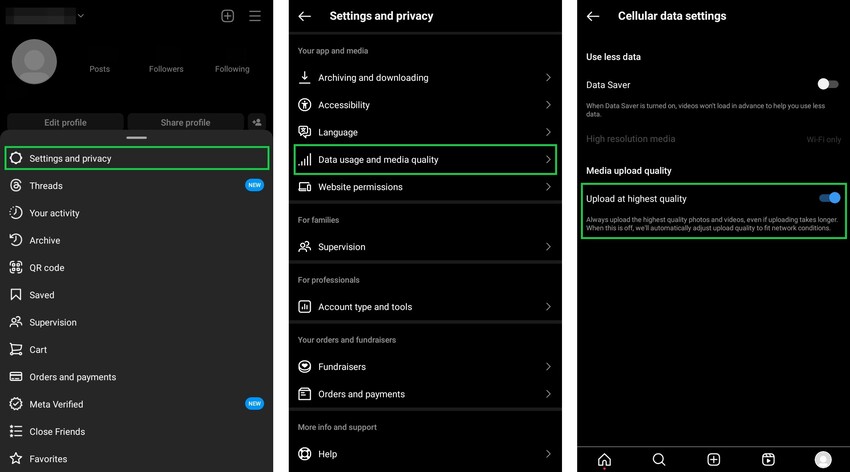
First, enable the option to upload at the highest quality. You can set this for all videos and Reels or for each individual Reel you share.
For the former, tap ![]() or your profile picture in the bottom right of the nav bar.
or your profile picture in the bottom right of the nav bar.

Tap ![]() in the top right.
in the top right.
Tap ![]() Settings and privacy. Tap Data usage and media quality. Tap the Upload at highest quality toggle setting
Settings and privacy. Tap Data usage and media quality. Tap the Upload at highest quality toggle setting ![]() under Media upload quality. You want it blue (on) not white (off).
under Media upload quality. You want it blue (on) not white (off).
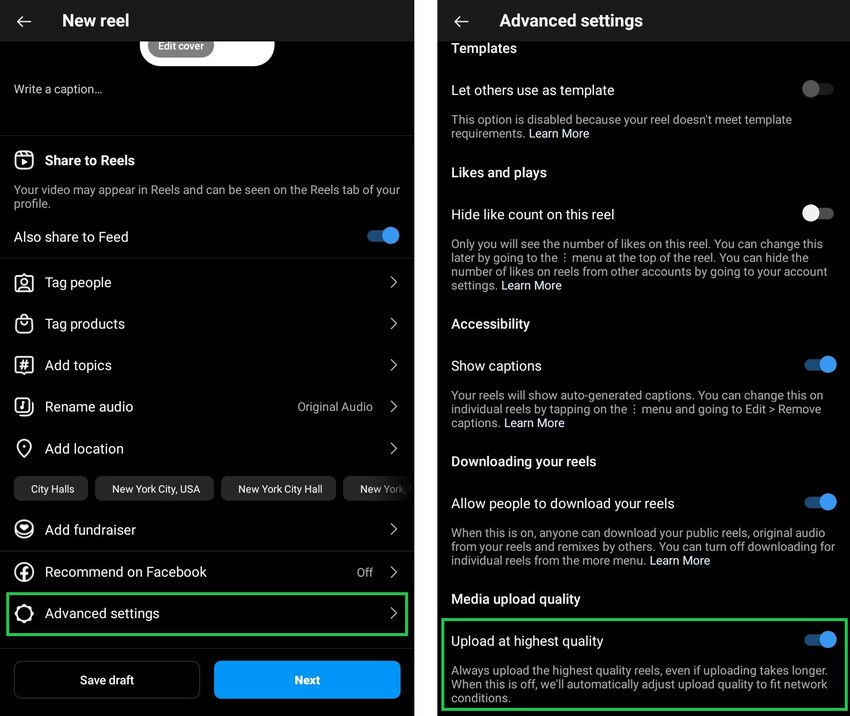
For the latter, tap Advanced settings after editing a Reel. You’ll also find the Upload at highest quality toggle here.
Next, set your export and codec settings. You can only do this in a third-party editor.
We highlight some of these settings earlier in the Instagram Reels Specifications subsection. Here are the key settings to note:
- Resolution: at least 1080 x 1920 pixels; some swear by 4K (3840 x 2160). You can try both and see which provides crisper results for you.
- Frame rate: 30 fps
- Format: .mp4
- Codec: h.264
- Bitrate: 3500 kbps minimum. The higher the better here. Test out results to find the best range for you.
- Audio channel: Stereo. Audio format: .aac. Audio sample rate: 128+ kbps.
Other export/codec/compression settings you may specify include progressive scan (no interlacing); fixed frame rate; chroma subsampling of 4:2:0; CABAC.
A Compendium of Impactful Instagram Reels Hacks and Ideas
Hacks
- Use trending audio in your Reels. Creators can find trending hashtags and songs in the newly-created dedicated Reels Trends section.
- Share Reels consistently.
- Open with a strong hook.
- Take full advantage of the latest tools; flagship functionalities like templates, remix (multi-frame clips), green screen effect; and the expansive stock of elements on offer like transitions, filters, and stickers.
- Collaborate with other creators and brands.
Ideas
- Create timelapse and stop motion Reels.
- Morph your favorite pics into Reel clips.
- Forms of video content that are excellent for Reels include tutorials and educational clips; behind the scenes or tour; highlight product and service; sharing updates; sneak peek, teasers, and promos; answer FAQs or enquiries from members of your fanbase.
- Repurpose other video content. Such as from Story highlights to Reels. Or splicing sections of a long-form video for enhanced exposure.
Leverage Analytics to Create Excellent Instagram Reels
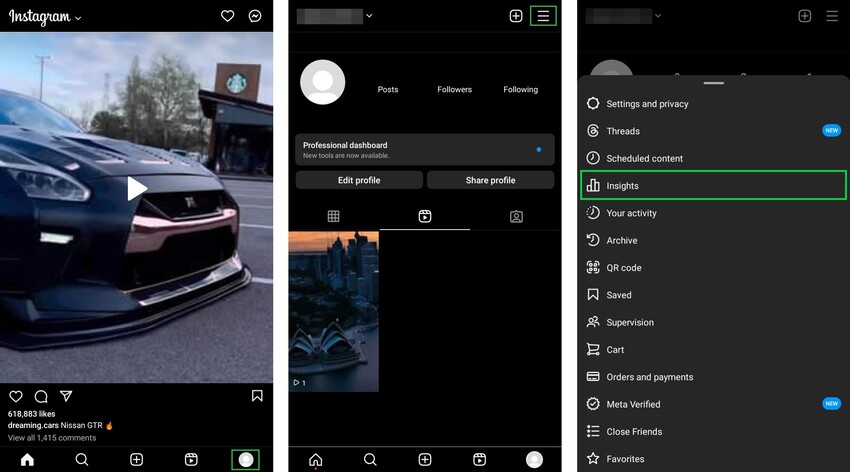
Instagram Reels Insights is the native analytics tool for tracking valuable metrics and data.
Use it to:
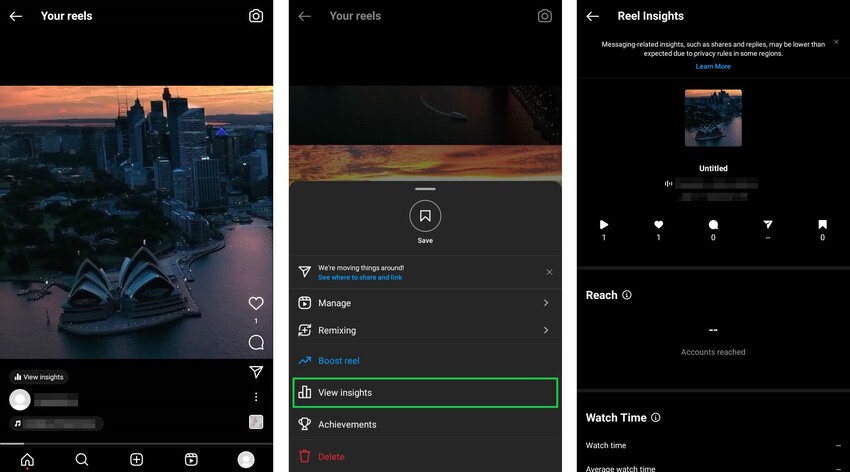
- view the Most Active Times to see how many followers are active at specific hours and days
- monitor the performance of each Reel you share
- Confirm total and average watch time as well how many interactions (likes, comments, shares, and saves) your Reels accrue.
Run tests—say different styles, length, audio options—to capture accurate data and figure out exactly what works for you.
Bear in mind that a business or creator account is required to access Reel Insights.
To view Reels Insights, go to your profile by tapping ![]() or your profile picture in the bottom right. Tap
or your profile picture in the bottom right. Tap ![]() in the top right. Then tap Insights.
in the top right. Then tap Insights.
To check the analytics for a specific Reel directly, navigate to the Reel via the Reels tab on your Instagram profile. Tap ![]() or your profile picture in the bottom right. Tap the Reel
or your profile picture in the bottom right. Tap the Reel ![]() tab next to your Feed. Select a Reel. Tap the View Insights button above the reel’s caption.
tab next to your Feed. Select a Reel. Tap the View Insights button above the reel’s caption.
Or tap the three-dot icon, ![]() on iPhone or
on iPhone or ![]() on Android, at the lower right of the reel. Tap View Insights.
on Android, at the lower right of the reel. Tap View Insights.
5 Burning FAQs About Making Instagram Reels
Can you make an Instagram Reel?
Any Instagram user can create Instagram reels. That said, we recommend you switch to a professional account to gain access to more functionalities.
Can I reuse TikTok videos on Reels?
Yes, you can; as they have similar vertical aspect ratios. However, we do NOT recommend you upload a clip on Instagram Reels if it has a Tiktok watermark.
Can you use Reels posted by other accounts in your Reel?
Yes. You can use another Reel as a template or to create a dual-frame reel via the Remix feature. Note that the original account has to permit this. This is enabled by default, but the permission can be pulled.
Can I create a reel on Instagram with images?
Yes, you can include still pictures in a reel. You can also add your (or another account’s) Instagram posts.
Where can you repost Instagram reels?
You can repost Instagram reels to Story, Feed, or have it recommended on Facebook.
Make Instagram Reels that Wow your Audience
Inspired by TikTok, but coming into its own in no time, Instagram Reels are certified crowd-pleasers. A marketing campaign will continue to hobble until it taps into the lush perks that the format liberally and reliably bequeaths.
Thankfully, you do not need an advanced degree to get a knack of how to make Instagram Reels that aid brand discovery and thrill your community of customers and uberfans.
We share the best practices to adhere to, the well-guarded secrets that wildly successful brands hoard, and make available a battery of in-demand growth plans to boost or trigger an influx of views, likes, and comments to your Instagram Reels.
For new or growing accounts, some marketers even choose to buy Instagram views as part of a broader visibility strategy to help Reels gain early traction and social proo
What has been your experience when making jaw-dropping Instagram Reels? Share with us in the comments.

BuzzVoice
BuzzVoice is the best place to go when you need instant engagement services on social media. Offering a wide variety of packages for Instagram, Youtube, Facebook, Twitter, Soundcloud & Tiktok.